Menus de Contêineres
Um guia explicando como criar um simples menu para um bloco de contêiner.
WARNING
Esta página foi escrita para a versão 26.2. A documentação de versões antigas pode estar incompleta.
PRÉ-REQUISITOS
Você deve primeiro ler Contêineres de Blocos se familiarizar com a criação de um contêiner de bloco entidade.
Ao abrir um contêiner, como um baú, duas coisas importantes são necessárias para exibir o seu conteúdo:
- uma
Screenque cuida da renderização dos conteúdos e do plano de fundo na exibição. - um
Menuque cuida na lógica de clicar com o Shift pressionado e a sincronização entre o servidor e o cliente.
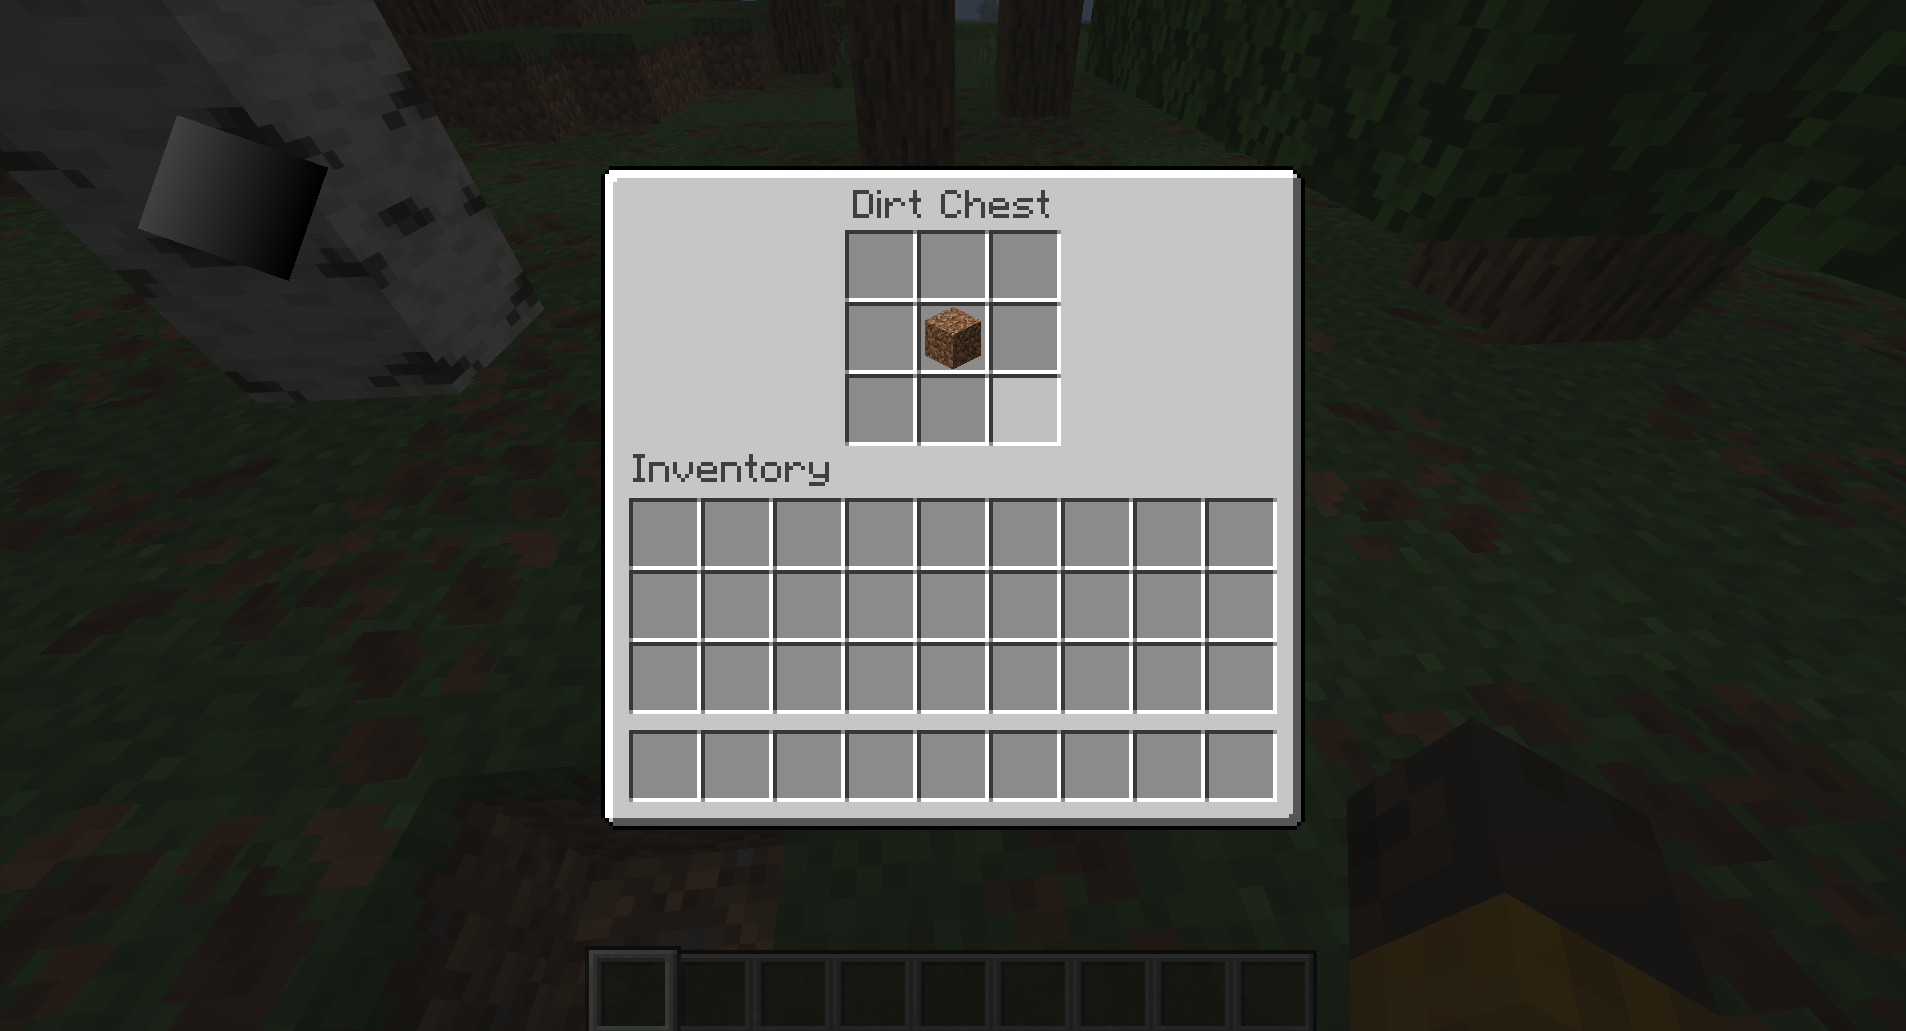
Nesse guia, nós vamos criar um baú de terra com um contêiner 3x3 que pode ser acessado ao clicar com o botão direito, abrindo uma tela.
Criando o Bloco
Primeiro, nós precisamos criar um bloco e um bloco entidade/; leia mais sobre no guia Contêineres de Blocos.
public class DirtChestBlock extends BaseEntityBlock {
	@Override
	public @Nullable BlockEntity newBlockEntity(BlockPos pos, BlockState state) {
		return new DirtChestBlockEntity(pos, state);
	}
	// ...
}public class DirtChestBlockEntity extends BlockEntity implements ImplementedContainer {
public static final int CONTAINER_SIZE = 3 * 3;
private final NonNullList<ItemStack> items = NonNullList.withSize(CONTAINER_SIZE, ItemStack.EMPTY);
// ...
}Em adição aos métodos de bloco entidade normais, nós precisamos sobrescrever o método stillValid. Esse método será chamado a cada tick para verificar se o jogador deve ser forçado a sair do menu. Nós vamos usar a implementação padrão desse método do ContainerHelper, que verifica se o nosso bloco entidade ainda existe e se o jogador está dentro do alcance de interação.
@Override
public boolean stillValid(Player player) {
	return Container.stillValidBlockEntity(this, player);
}Após implementar o nosso menu, ele se fechará automaticamente quando o jogador é empurrado para longe.
Abrindo o Menu
Nós queremos conseguir abrir o menu de alguma maneira, então vamos cuidar disso com o método useWithoutItem:
@Override
protected InteractionResult useWithoutItem(BlockState state, Level level, BlockPos pos, Player player, BlockHitResult hit) {
	if (!level.isClientSide() && level.getBlockEntity(pos) instanceof DirtChestBlockEntity dirtChest) {
		player.openMenu(dirtChest);
	}

	return InteractionResult.SUCCESS;
}Implementando o MenuProvider
Para adicionar a funcionalidade de menu, precisamos agora implementar o MenuProvider no bloco entidade:
public class DirtChestBlockEntity extends BlockEntity implements ImplementedContainer, MenuProvider {
	@Override
	@NonNull
	public Component getDisplayName() {
		return Component.translatable("block.example-mod.dirt_chest");
	}

	@Override
	public @Nullable AbstractContainerMenu createMenu(int containerId, Inventory inventory, Player player) {
		return null;
	}
	// ...
}O método getDisplayName retorna o nome do bloco, que será exibido no topo da tela.
Criando o Menu
O createMenu quer que nós retornamos um menu, mas nós ainda não criamos um para o nosso bloco. Para fazer isso, nós criaremos uma classe DirtChestMenu que estende AbstractContainerMenu:
public class DirtChestMenu extends AbstractContainerMenu {
	private static final int SLOTS_ROWS = 3;
	private static final int SLOTS_COLUMNS = 3;
	private static final int SLOTS_COUNT = SLOTS_ROWS * SLOTS_COLUMNS;

	private static final int CONTAINER_START = 0;
	private static final int CONTAINER_END = SLOTS_COUNT;
	private static final int INVENTORY_START = CONTAINER_END;
	private static final int INVENTORY_END = INVENTORY_START + Inventory.INVENTORY_SIZE;

	private static final int CONTAINER_START_X = 62;
	private static final int CONTAINER_START_Y = 17;
	private static final int INVENTORY_START_X = 8;
	private static final int INVENTORY_START_Y = 84;

	private final Container container;

	// Client-side constructor
	public DirtChestMenu(final int containerId, final Inventory inventory) {
		this(containerId, inventory, new SimpleContainer(SLOTS_COUNT));
	}

	// Server-side constructor
	public DirtChestMenu(final int containerId, final Inventory inventory, final Container container) {
		super(ModMenuTypes.DIRT_CHEST, containerId);
		checkContainerSize(container, SLOTS_COUNT);
		this.container = container;

		// Some containers do custom logic when opened by a player.
		container.startOpen(inventory.player);

		// Add the slots for our container in a 3x3 grid.
		this.add3x3GridSlots();

		// Add the player inventory slots.
		this.addStandardInventorySlots(inventory, INVENTORY_START_X, INVENTORY_START_Y);
	}

	private void add3x3GridSlots() {
		for (int y = 0; y < SLOTS_ROWS; y++) {
			for (int x = 0; x < SLOTS_COLUMNS; x++) {
				final int slot = x + y * SLOTS_COLUMNS;
				this.addSlot(new Slot(
								this.container,
								slot,
								CONTAINER_START_X + x * SLOT_SIZE,
								CONTAINER_START_Y + y * SLOT_SIZE
				));
			}
		}
	}

	@Override
	public ItemStack quickMoveStack(Player player, int slotIndex) {
		Slot slot = this.slots.get(slotIndex);

		if (!slot.hasItem()) {
			return ItemStack.EMPTY;
		}

		ItemStack stack = slot.getItem();
		ItemStack clicked = stack.copy();

		if (slotIndex < CONTAINER_END) {
			// If the clicked slot is in the container, try moving the item to the player inventory.
			// When moving into the player's inventory, we iterate over slots in a reversed order; starting from the last hotbar slot to the first inventory slot.
			if (!this.moveItemStackTo(stack, INVENTORY_START, INVENTORY_END, /* backwards: */ true)) {
				return ItemStack.EMPTY; // Nothing changed
			}
		} else {
			// Else, move the item from the player inventory to the container.
			if (!this.moveItemStackTo(stack, CONTAINER_START, CONTAINER_END, /* backwards: */ false)) {
				return ItemStack.EMPTY; // Nothing changed
			}
		}

		// At this point, something has changed.
		if (stack.isEmpty()) {
			// The whole stack was moved, so we set the slot to empty.
			slot.setByPlayer(ItemStack.EMPTY);
		} else {
			// At least part of the slot was moved. Previous logic handles the amount changes, we just need to update the slot.
			slot.setChanged();
		}

		return clicked;
	}

	@Override
	public boolean stillValid(Player player) {
		return this.container.stillValid(player);
	}

	@Override
	public void removed(Player player) {
		super.removed(player);
		this.container.stopOpen(player);
	}
}O construtor do lado do cliente será chamado ao cliente quando o servidor querer abrir um menu. Ele cria um contêiner vazio que sincroniza então automaticamente com o verdadeiro contêiner no servidor.
O construtor do lado do cliente é chamado no servidor, e por ele saber o conteúdo do contêiner, ele pode o passar diretamente como um argumento.
quickMovesStack lida com os itens movidos ao clicar com o Shift pressionado dentro do menu. Esse exemplo replica o comportamento dos menus vanilla, como os baús e ejetores.
Então precisamos registrar o menu em uma nova classe ModMenuTypes:
public class ModMenuTypes {
	public static final MenuType<DirtChestMenu> DIRT_CHEST = register("dirt_chest", DirtChestMenu::new);

	public static <T extends AbstractContainerMenu> MenuType<T> register(
					String name,
					MenuType.MenuSupplier<T> constructor
	) {
		return Registry.register(BuiltInRegistries.MENU, ExampleMod.id(name), new MenuType<>(constructor, FeatureFlagSet.of()));
	}
}Nós podemos agora definir o valor do createMenu no bloco entidade para usar o nosso menu:
@Override
public @Nullable AbstractContainerMenu createMenu(int containerId, Inventory inventory, Player player) {
	return new DirtChestMenu(containerId, inventory, this);
}INFO
O método createMenu é chamado apenas no servidor, assim nós chamamos o construtor do lado do servidor e passamos this (o bloco entidade) como um parâmetro de contêiner.
Criando a Tela
Para realmente exibir o conteúdo do contêiner no lado do cliente, nós também precisamos criar uma tela para o nosso menu. Nós criaremos uma nova classe que estendeAbstractContainerScreen:
public class DirtChestScreen extends AbstractContainerScreen<DirtChestMenu> {
	private static final Identifier CONTAINER_TEXTURE = Identifier.withDefaultNamespace("textures/gui/container/dispenser.png");

	public DirtChestScreen(DirtChestMenu abstractContainerMenu, Inventory inventory, Component component) {
		super(abstractContainerMenu, inventory, component);
		// Center the title
		this.titleLabelX = (this.imageWidth - this.font.width(this.title)) / 2;
	}

	@Override
	public void extractBackground(GuiGraphicsExtractor graphics, int mouseX, int mouseY, float delta) {
		super.extractBackground(graphics, mouseX, mouseY, delta);
		graphics.blit(RenderPipelines.GUI_TEXTURED, CONTAINER_TEXTURE, this.leftPos, this.topPos, 0.0F, 0.0F, this.imageWidth, this.imageHeight, BACKGROUND_TEXTURE_WIDTH, BACKGROUND_TEXTURE_HEIGHT);
	}
}Para o plano de fundo dessa tela, nós vamos apenas usar a textura padrão do Ejetor, pois o nosso baú de terra usa o mesmo layout de slots. Você pode alternativamente fornecer a sua própria textura para CONTAINER_TEXTURE.
Por isso ser uma tela para um menu, nós também precisamos registrá-lo no cliente com o método MenuScreens#register():
public class ExampleModScreens implements ClientModInitializer {
	@Override
	public void onInitializeClient() {
		MenuScreens.register(ModMenuTypes.DIRT_CHEST, DirtChestScreen::new);
	}
}Ao carregar o seu jogo, você agora deve possuir um bloco de terra que pode ser aberto clicando com o botão direito para abrir um menu e armazenar itens dentro.