INFO
본 튜토리얼은 서버에서 처리되는 화면이 아닌 클라이언트에서 표시되는 일반 화면 에 대한 튜토리얼입니다.
화면은 일반적으로 타이틀 화면, 일시 정지 화면 등과 같이 플레이어가 상호 작용하는 GUI를 의미합니다.
이러한 화면은 사용자 정의 정보, 사용자 정의 설정 메뉴 등을 표시하기 위해 직접 만들 수 있습니다.
화면 만들기
화면을 만드려면, 먼저 Screen 클래스를 확장하는(Extend) 클래스를 만들고, init 메소드를 덮어 써야(Override) 합니다.
사용자 정의 화면을 제작할 때 다음 사항에 유의해야 합니다.
- 생성자 메소드에서 화면이 초기화되지 않기 때문에 위젯또한 생성되지 않습니다.
init메소드는 화면이 초기화되었을 때 호출되므로, 위젯을 만들기에 가장 좋은 위치입니다.- 모든 그려질 수 있는 위젯이 입력되는
addDrawableChild메소드를 통해 위젯을 추가합니다.
- 모든 그려질 수 있는 위젯이 입력되는
render메소드는 매 프레임마다 호출되므로, 메소드를 통해 그려지는 컨텍스트, 마우스 포인터의 위치에 접근할 수 있습니다.
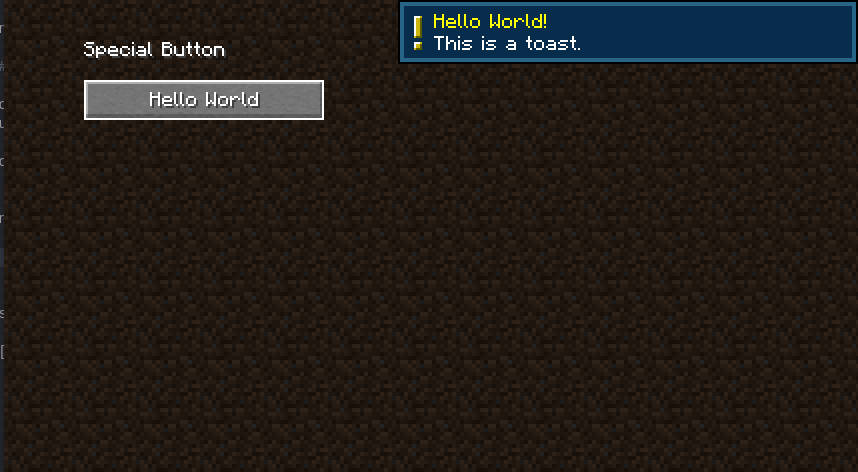
예를 들어, 라벨이 위에 있는 버튼이 있는 간단한 화면을 만들어 보겠습니다.
java
public class CustomScreen extends Screen {
	public CustomScreen(Component title) {
		super(title);
	}

	@Override
	protected void init() {
		Button buttonWidget = Button.builder(Component.literal("Hello World"), (btn) -> {
			// When the button is clicked, we can display a toast to the screen.
			this.minecraft.getToastManager().addToast(
					SystemToast.multiline(this.minecraft, SystemToast.SystemToastId.NARRATOR_TOGGLE, Component.nullToEmpty("Hello World!"), Component.nullToEmpty("This is a toast."))
			);
		}).bounds(40, 40, 120, 20).build();
		// x, y, width, height
		// It's recommended to use the fixed height of 20 to prevent rendering issues with the button
		// textures.

		// Register the button widget.
		this.addRenderableWidget(buttonWidget);

	}

	@Override
	public void render(GuiGraphics graphics, int mouseX, int mouseY, float delta) {
		super.render(graphics, mouseX, mouseY, delta);

		// Minecraft doesn't have a "label" widget, so we'll have to draw our own text.
		// We'll subtract the font height from the Y position to make the text appear above the button.
		// Subtracting an extra 10 pixels will give the text some padding.
		// textRenderer, text, x, y, color, hasShadow
		graphics.drawString(this.font, "Special Button", 40, 40 - this.font.lineHeight - 10, 0xFFFFFFFF, true);
	}
}
1
2
3
4
5
6
7
8
9
10
11
12
13
14
15
16
17
18
19
20
21
22
23
24
25
26
27
28
29
30
31
32
33
2
3
4
5
6
7
8
9
10
11
12
13
14
15
16
17
18
19
20
21
22
23
24
25
26
27
28
29
30
31
32
33

화면 열기
화면은 MinecraftClient의 setScreen 메소드를 통해 열 수 있습니다.
java
MinecraftClient.getInstance().setScreen(
  new CustomScreen(Text.empty())
);
1
2
3
2
3
화면 닫기
만약 화면을 닫고 싶다면, setScreen 메소드를 통해 간단하게 화면을 null 로 설정하면 됩니다.
java
MinecraftClient.getInstance().setScreen(null);1
만약 디테일하게 이전 화면으로 되돌아가는 기능을 추가하고 싶다면, 현재 화면을 CustomScreen 생성자에 입력하여 필드에 저장하고, close 메소드가 호출되었을 때 해당 필드를 사용하여 이전 화면으로 되돌아가면 됩니다.
java
public Screen parent;
public CustomScreen(Component title, Screen parent) {
	super(title);
	this.parent = parent;
}

@Override
public void onClose() {
	this.minecraft.setScreen(this.parent);
}
1
2
3
4
5
6
7
8
9
10
11
2
3
4
5
6
7
8
9
10
11
이제, 사용자 정의 화면이 열릴 때, 현재 화면을 두 번째 매개변수에 입력하면, CustomScreen#close가 호출되었을 때 이전 화면으로 되돌아갈 것입니다.
java
Screen currentScreen = MinecraftClient.getInstance().currentScreen;
MinecraftClient.getInstance().setScreen(
  new CustomScreen(Text.empty(), currentScreen)
);
1
2
3
4
2
3
4

