
INFO
這篇教學只包含一般介面,不包含同步介面 HandledScreen,一般畫面只會在客戶端顯示,不會與伺服器同步。
畫面就是玩家可以互動的圖形介面,例如:主畫面,暫停選單。
你可以建立自己的畫面來顯示自訂內容、設定等。
創建一個畫面
創建一個畫面會需要繼承(extend)Screen 類別和重寫 (override)init 函式,你也可以重寫(override)render 函式,但請確保呼叫父類函式(super),不然背景以及畫面元件不會被顯示。
請注意:
- 畫面元件不應該在建構子裡被創造,因為畫面還沒建構完成,部分變數(例如:寬度
width、高度height)還無法被存取或是不準確。 init函式是在畫面被創建時呼叫的,所以創建畫面元件最適合在裡面執行。addDrawableChild函式負責顯示畫面元件,他可以顯示任何可以被繪製(drawable)的畫面元件。
render函式每幀都會被執行,在函式中可以獲取圖形繪器DrawContext和滑鼠位置mouseXmouseY。
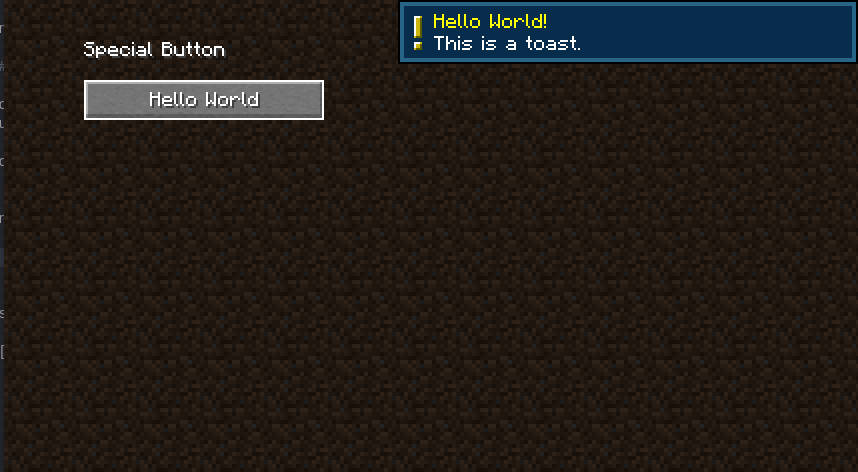
我們將創建一個簡單的畫面,畫面包含一個按鈕和一串標示。
java
public class CustomScreen extends Screen {
	public CustomScreen(Component title) {
		super(title);
	}

	@Override
	protected void init() {
		Button buttonWidget = Button.builder(Component.nullToEmpty("Hello World"), (btn) -> {
			// When the button is clicked, we can display a toast to the screen.
			this.minecraft.getToastManager().addToast(
					SystemToast.multiline(this.minecraft, SystemToast.SystemToastId.NARRATOR_TOGGLE, Component.nullToEmpty("Hello World!"), Component.nullToEmpty("This is a toast."))
			);
		}).bounds(40, 40, 120, 20).build();
		// x, y, width, height
		// It's recommended to use the fixed height of 20 to prevent rendering issues with the button
		// textures.

		// Register the button widget.
		this.addRenderableWidget(buttonWidget);

	}

	@Override
	public void render(GuiGraphics context, int mouseX, int mouseY, float delta) {
		super.render(context, mouseX, mouseY, delta);

		// Minecraft doesn't have a "label" widget, so we'll have to draw our own text.
		// We'll subtract the font height from the Y position to make the text appear above the button.
		// Subtracting an extra 10 pixels will give the text some padding.
		// textRenderer, text, x, y, color, hasShadow
		context.drawString(this.font, "Special Button", 40, 40 - this.font.lineHeight - 10, 0xFFFFFFFF, true);
	}
}
打開畫面
你可以透過 MinecraftClient 的 setScreen 函式來打開自訂畫面,開啟的方法可以有很多(例如:按鍵,指令,封包)。
java
MinecraftClient.getInstance().setScreen(
  new CustomScreen(Text.empty())
);關閉畫面
如果你想要關閉畫面回到遊戲,可以使用 setScreen(null) 函式。
java
MinecraftClient.getInstance().setScreen(null);如果你想要回到上一個畫面,在現在的畫面的建構子裡傳入上一個畫面,並將它保存到參數裡,然後在 close 函式裡呼叫 setScreen(/* 剛剛保存的畫面 */) 。
java
public Screen parent;
public CustomScreen(Component title, Screen parent) {
	super(title);
	this.parent = parent;
}

@Override
public void onClose() {
	this.minecraft.setScreen(this.parent);
}這樣當你在開啟新的畫面時,你可以把現在的畫面傳入建構子中,然後在 CustomScreen#Close 執行時,就可以回到上個畫面了。
java
Screen currentScreen = MinecraftClient.getInstance().currentScreen;
MinecraftClient.getInstance().setScreen(
  new CustomScreen(Text.empty(), currentScreen)
);