INFO
This page refers to normal screens, not handled ones - these screens are the ones that are opened by the player on the client, not the ones that are handled by the server.
Screens are essentially the GUIs that the player interacts with, such as the title screen, pause screen etc.
You can create your own screens to display custom content, a custom settings menu, or more.
Creating a Screen
To create a screen, you need to extend the Screen class and override the init method - you may optionally override the render method as well - but make sure to call it's super method or it wont render the background, widgets etc.
You should take note that:
- Widgets are not being created in the constructor because the screen is not yet initialized at that point - and certain variables, such as
widthandheight, are not yet available or not yet accurate. - The
initmethod is called when the screen is being initialized, and it is the best place to create widgets.- You add widgets using the
addRenderableWidgetmethod, which accepts any drawable widget.
- You add widgets using the
- The
rendermethod is called every frame - you can access the draw context, and the mouse position from this method.
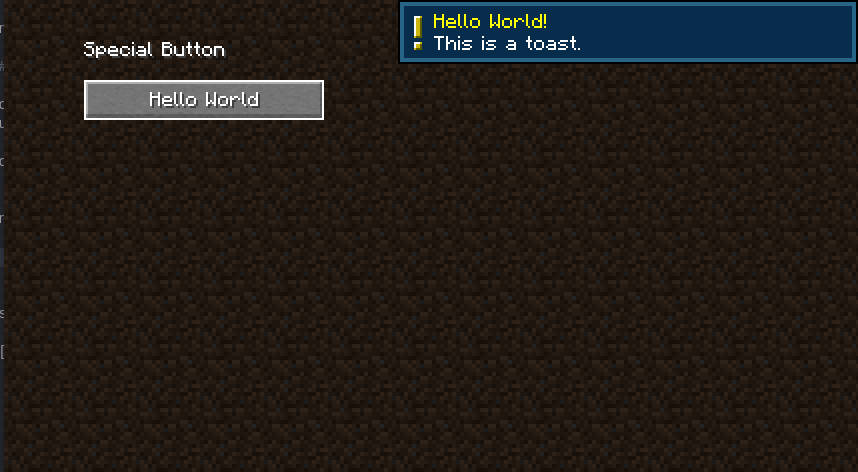
As an example, we can create a simple screen that has a button and a label above it.
java
public class CustomScreen extends Screen {
	public CustomScreen(Component title) {
		super(title);
	}

	@Override
	protected void init() {
		Button buttonWidget = Button.builder(Component.literal("Hello World"), (btn) -> {
			// When the button is clicked, we can display a toast to the screen.
			this.minecraft.getToastManager().addToast(
					SystemToast.multiline(this.minecraft, SystemToast.SystemToastId.NARRATOR_TOGGLE, Component.nullToEmpty("Hello World!"), Component.nullToEmpty("This is a toast."))
			);
		}).bounds(40, 40, 120, 20).build();
		// x, y, width, height
		// It's recommended to use the fixed height of 20 to prevent rendering issues with the button
		// textures.

		// Register the button widget.
		this.addRenderableWidget(buttonWidget);

	}

	@Override
	public void render(GuiGraphics graphics, int mouseX, int mouseY, float delta) {
		super.render(graphics, mouseX, mouseY, delta);

		// Minecraft doesn't have a "label" widget, so we'll have to draw our own text.
		// We'll subtract the font height from the Y position to make the text appear above the button.
		// Subtracting an extra 10 pixels will give the text some padding.
		// textRenderer, text, x, y, color, hasShadow
		graphics.drawString(this.font, "Special Button", 40, 40 - this.font.lineHeight - 10, 0xFFFFFFFF, true);
	}
}
1
2
3
4
5
6
7
8
9
10
11
12
13
14
15
16
17
18
19
20
21
22
23
24
25
26
27
28
29
30
31
32
33
2
3
4
5
6
7
8
9
10
11
12
13
14
15
16
17
18
19
20
21
22
23
24
25
26
27
28
29
30
31
32
33

Opening the Screen
You can open the screen using the Minecraft's setScreen method - you can do this from many places, such as a key binding, a command, or a client packet handler.
java
Minecraft.getInstance().setScreen(
  new CustomScreen(Component.empty())
);
1
2
3
2
3
Closing the Screen
If you want to close the screen, simply set the screen to null:
java
Minecraft.getInstance().setScreen(null);1
If you want to be fancy, and return to the previous screen, you can pass the current screen into the CustomScreen constructor and store it in a field, then use it to return to the previous screen when the close method is called.
java
public Screen parent;
public CustomScreen(Component title, Screen parent) {
	super(title);
	this.parent = parent;
}

@Override
public void onClose() {
	this.minecraft.setScreen(this.parent);
}
1
2
3
4
5
6
7
8
9
10
11
2
3
4
5
6
7
8
9
10
11
Now, when opening the custom screen, you can pass the current screen as the second argument - so when you call CustomScreen#close - it will return to the previous screen.
java
Screen currentScreen = Minecraft.getInstance().currentScreen;
Minecraft.getInstance().setScreen(
  new CustomScreen(Component.empty(), currentScreen)
);
1
2
3
4
2
3
4

