INFO
Esta página se refiere a pantallas normales, y no pantallas manejadas - estas pantallas son las que son abiertas por el jugador en el cliente, no las que son manejadas por el servidor.
Las pantallas son esencialmente la interfaz gráfica con la que jugador interactúa con, como el menú principal, el menú de pausa, etc.
Puedes crear tus propios menús para mostrar contenido personalizado, un menú de configuraciones personalizado, o más.
Creando una Pantalla
Para crear una pantalla, necesitarás extender la clase Screen y anular el método init (inicializar) - opcionalmente también anular el método render - pero asegúrate de llamar su implementación súper, de lo contrario no se renderizará el fondo, los widgets, etc.
Toma en cuenta que:
- Los widgets no son creados en el constructor de la clase porque la pantalla aún no ha sido inicializada a este punto - y ciertas variables, como
width(ancho) yheight(altura), aún no están disponibles o no tienen valores correctos. - El método
inites llamado cuando la pantalla es inicializada, y es el mejor lugar para crear widgets.- Agregas widgets usando el método
addDrawableChild, el cual acepta cualquier widget dibujable.
- Agregas widgets usando el método
- El método
renderes llamado en cada frame - puedes acceder el contexto de dibujado, y la posición del mouse desde este método.
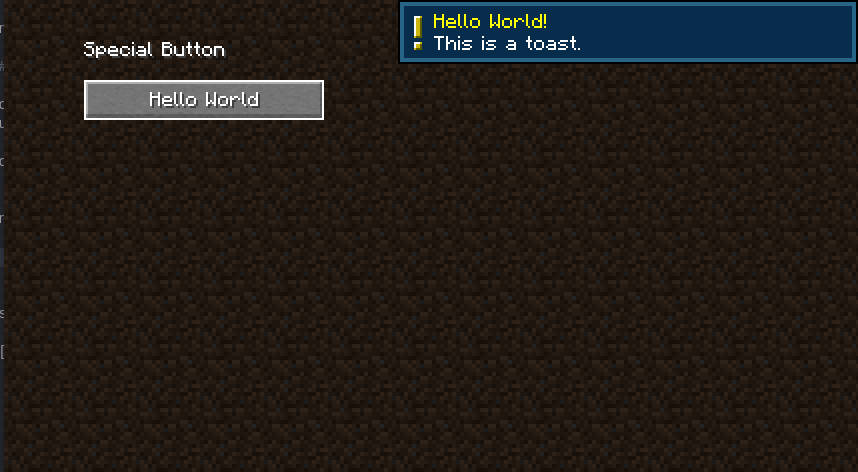
Por ejemplo, podemos crear una pantalla simple que tiene un botón y una etiqueta arriba.
java
public class CustomScreen extends Screen {
	public CustomScreen(Component title) {
		super(title);
	}

	@Override
	protected void init() {
		Button buttonWidget = Button.builder(Component.nullToEmpty("Hello World"), (btn) -> {
			// When the button is clicked, we can display a toast to the screen.
			this.minecraft.getToastManager().addToast(
					SystemToast.multiline(this.minecraft, SystemToast.SystemToastId.NARRATOR_TOGGLE, Component.nullToEmpty("Hello World!"), Component.nullToEmpty("This is a toast."))
			);
		}).bounds(40, 40, 120, 20).build();
		// x, y, width, height
		// It's recommended to use the fixed height of 20 to prevent rendering issues with the button
		// textures.

		// Register the button widget.
		this.addRenderableWidget(buttonWidget);

	}

	@Override
	public void render(GuiGraphics context, int mouseX, int mouseY, float delta) {
		super.render(context, mouseX, mouseY, delta);

		// Minecraft doesn't have a "label" widget, so we'll have to draw our own text.
		// We'll subtract the font height from the Y position to make the text appear above the button.
		// Subtracting an extra 10 pixels will give the text some padding.
		// textRenderer, text, x, y, color, hasShadow
		context.drawString(this.font, "Special Button", 40, 40 - this.font.lineHeight - 10, 0xFFFFFFFF, true);
	}
}
1
2
3
4
5
6
7
8
9
10
11
12
13
14
15
16
17
18
19
20
21
22
23
24
25
26
27
28
29
30
31
32
33
2
3
4
5
6
7
8
9
10
11
12
13
14
15
16
17
18
19
20
21
22
23
24
25
26
27
28
29
30
31
32
33

Abrir La Panatalla
Puedes abrir la pantalla usando el método setScreen de la clase MinecraftClient - puedes hacer esto desde muchos lugares, como un key binding, un comando, o un manipulador de paquetes de cliente.
java
MinecraftClient.getInstance().setScreen(
  new CustomScreen(Text.empty())
);
1
2
3
2
3
Cerrar La Pantalla
Si quieres cerrar la pantalla, simplemente establece la pantalla actual a un valor null (nulo):
java
MinecraftClient.getInstance().setScreen(null);1
Si quieres ser más elegante, y retornar a la pantalla anterior, puedes pasar la pantalla actual al constructor de la clase de CustomScreen y guardarla en un miembro, y después puedes usarlo para volver a la pantalla anterior cuando el método close es llamado.
java
public Screen parent;
public CustomScreen(Component title, Screen parent) {
	super(title);
	this.parent = parent;
}

@Override
public void onClose() {
	this.minecraft.setScreen(this.parent);
}
1
2
3
4
5
6
7
8
9
10
11
2
3
4
5
6
7
8
9
10
11
Ahora, cuando abramos la pantalla personalizada, puedes pasar la pantalla actual como el segundo argumento - para que cuando llames CustomScreen#close - volverá a la pantalla anterior.
java
Screen currentScreen = MinecraftClient.getInstance().currentScreen;
MinecraftClient.getInstance().setScreen(
  new CustomScreen(Text.empty(), currentScreen)
);
1
2
3
4
2
3
4

