
动态和交互式声音 26.1.2
创建更具动态和交互性的声音
SoundEvents 的问题
正如我们在 使用声音 页面中了解到的,最好在逻辑服务器端使用 SoundEvent,即使这有点反直觉。 毕竟,客户端需要处理传输到耳机的声音,对吧?
这么想是对的。 从技术上讲,客户端需要处理音频。 然而,对于简单的 SoundEvent 播放,服务端准备了一个乍一看可能并不明显的一大步。 哪些客户端应该能够听到该声音?
在逻辑服务器端使用声音将解决广播 SoundEvent 的问题。 简单来说,每个在跟踪范围内的客户端(LocalPlayer)都会收到一个网络数据包来播放这个特定的声音。 声音事件基本上从逻辑服务器端广播到每个参与的客户端,你根本无需考虑它。 声音以指定的音量和音调值播放一次。
但如果这还不够呢? 如果声音需要循环、播放时动态改变音量和音调,并且所有这些都基于来自 Entities 或 BlockEntities 之类的值,该怎么办呢?
对于这种用例来说,在逻辑服务器端使用 SoundEvent 的简单方法还不够。
准备音频文件
我们将为另一个 SoundEvent 创建一个新的循环音频。 如果你能找到一个已经无缝循环的音频文件,你可以直接按照创建自定义声音中的步骤进行操作。 如果声音还不能无缝循环,我们就必须做准备。
同样,大多数新型 DAW(数字音频工作站软件)应该能够做到这一点,但如果音频编辑更复杂一些,我更倾向于使用 [Reaper](https://www.reaper.fm/)。
设置
我们的 起始声音 将来自引擎。
我们将文件加载到我们选择的 DAW 中。
我们可以听到和看到,引擎在开始时启动并在结束时停止,这对于循环声音来说并不好。 让我们把它们剪掉,然后调整时间选择手柄来匹配新的长度。 还可以启用 切换重复 模式,让音频循环播放,以便我们进行调整。
移除干扰性音频元素
如果我们仔细聆听,会发现背景中传来哔哔的声音,可能是机器发出的。 我觉得这在游戏里听起来不太好,所以我们尽量把它去掉。
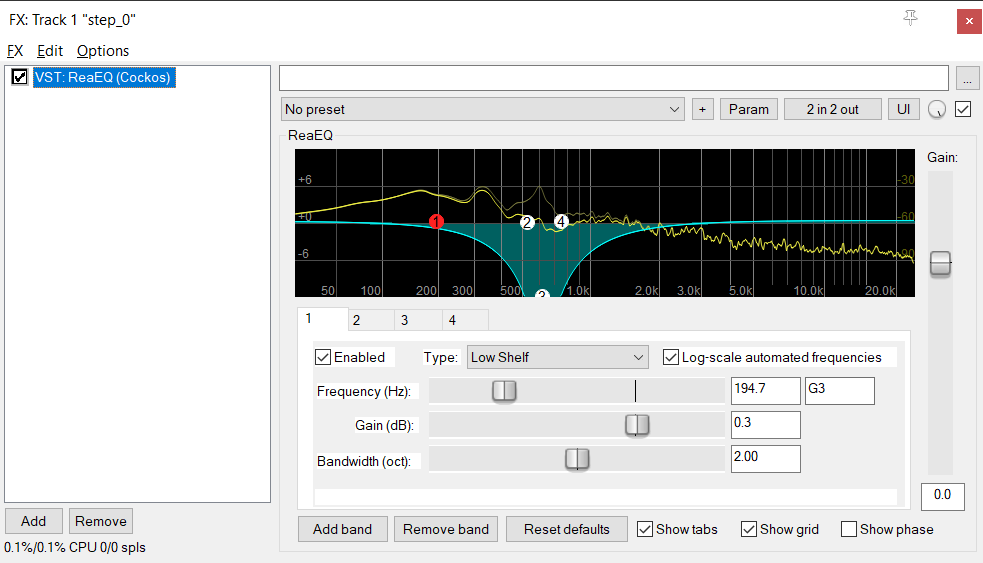
它是一种恒定的声音,其频率在整个音频长度内保持不变。 因此,一个简单的 EQ 滤波器就足以将其滤除。
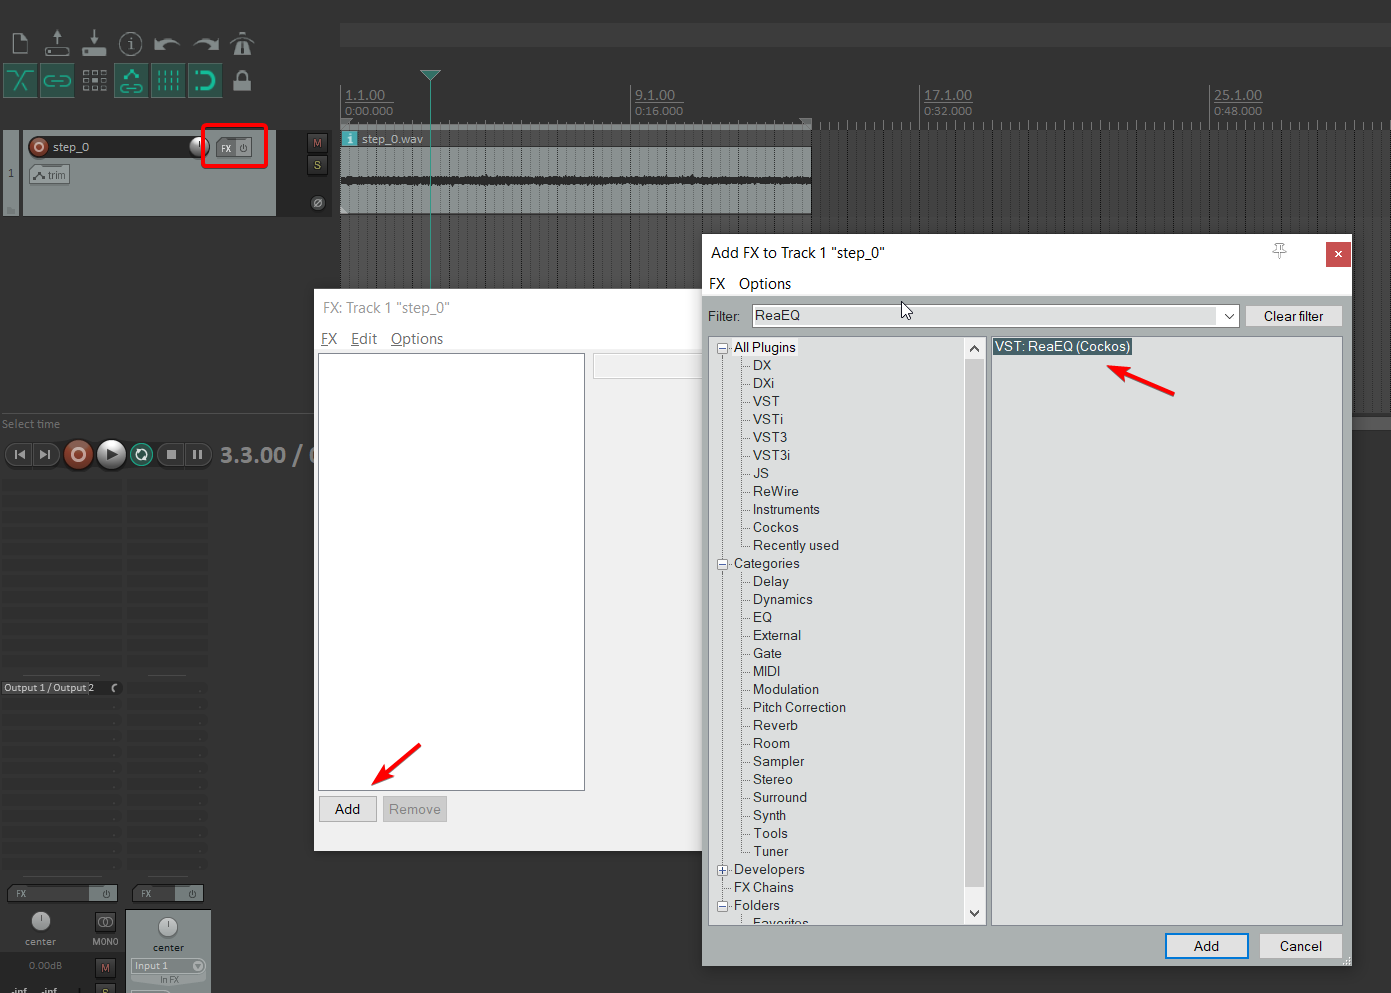
Reaper 附带一个 EQ 滤波器,叫做“ReaEQ”。 它可能位于其他地方并且在其他 DAW 中的名称不同,但如今使用 EQ 是大多数 DAW 的标准。
如果你确定你的 DAW 没有可用的 EQ 滤波器,请上网查找免费的 VST 替代品,你可以将其安装在你选择的 DAW 中。
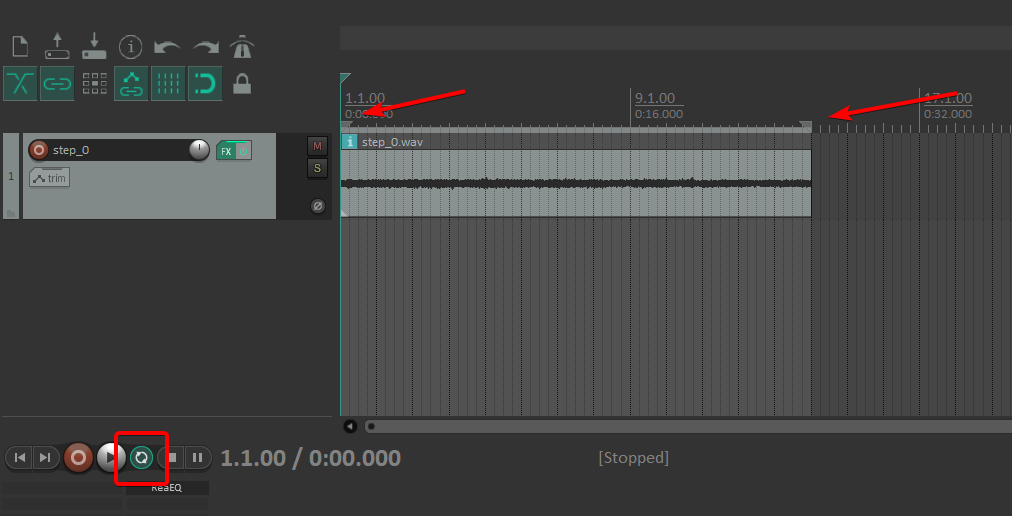
在 Reaper 中使用效果窗口添加“ReaEQ”音频效果或任何其他 EQ。
如果我们现在播放音频,同时保持 EQ 滤波器窗口打开,EQ 滤波器将在其显示屏上显示传入的音频。 我们可以看到上面有很多凸起。
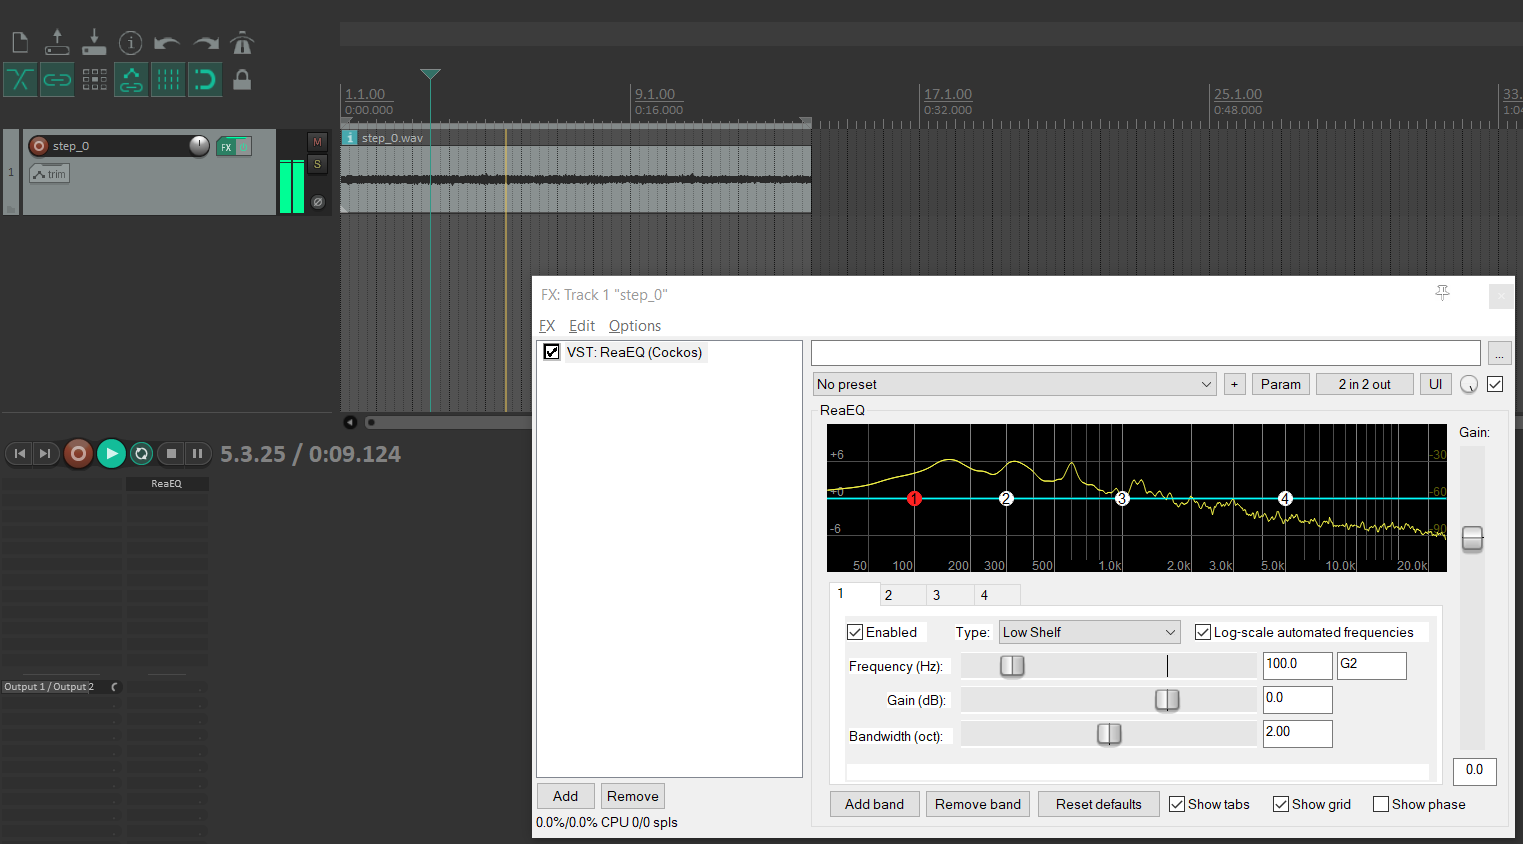
如果你不是经过培训的音频工程师,本部分主要涉及实验和“反复试错”。 节点 2 和 3 之间存在相当严重的凸起。 我们移动节点,以便仅降低该部分的频率。
此外,还可以使用简单的 EQ 滤波器实现其他效果。 例如,切割高频和低频可以给人一种无线电传输声音的印象。
你还可以分层放置更多音频文件、更改音调、添加一些混响或使用更精致的音效,如“bit-crusher”。 声音设计可以很有趣,特别是当你偶然发现音频中好听的变化时。 实验是关键,也许你的声音最终会比以前更好。
我们将继续使用 EQ 滤波器,用它来消除有问题的频率。
比较
让我们将原始文件与清理后的版本进行比较。
在原始声音中,你可以听到可能是引擎电气元件发出的独特的嗡嗡声和哔哔声。
使用 EQ 滤波器,我们几乎可以将其完全去除。 听起来肯定更加愉快。
使其循环
如果我们让声音播放到结尾,然后再从头开始,我们就能清楚地听到正在发生的过渡。 目标是通过平滑过渡来消除这种情况。
首先从末尾剪切一段,其大小与你想要的过渡大小相同,然后将其放在新音轨的开头。 在 Reaper 中,你只需将光标移动到剪切位置并按 S 即可分割音频。
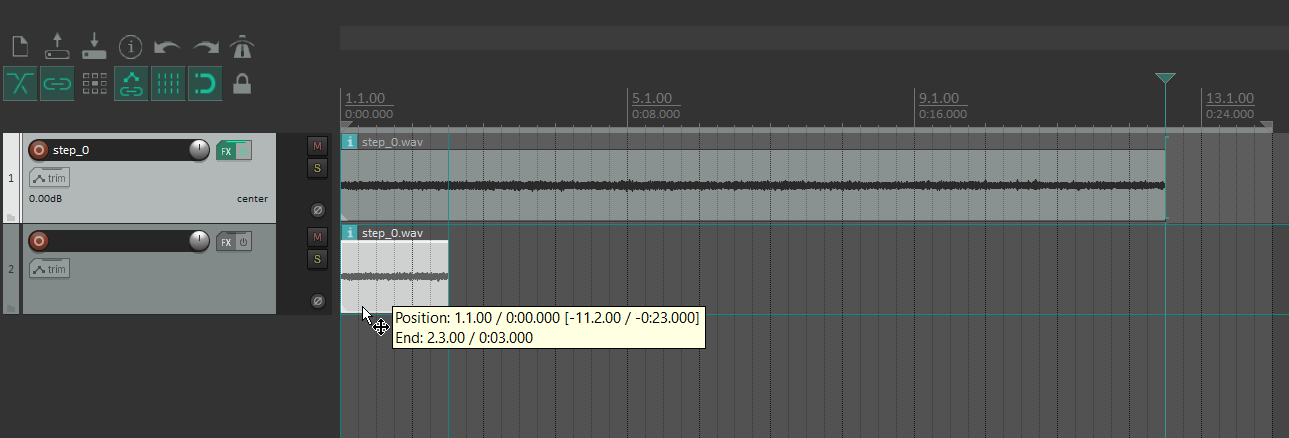
你可能还需要将第一个音轨的 EQ 音频效果复制到第二个音轨。
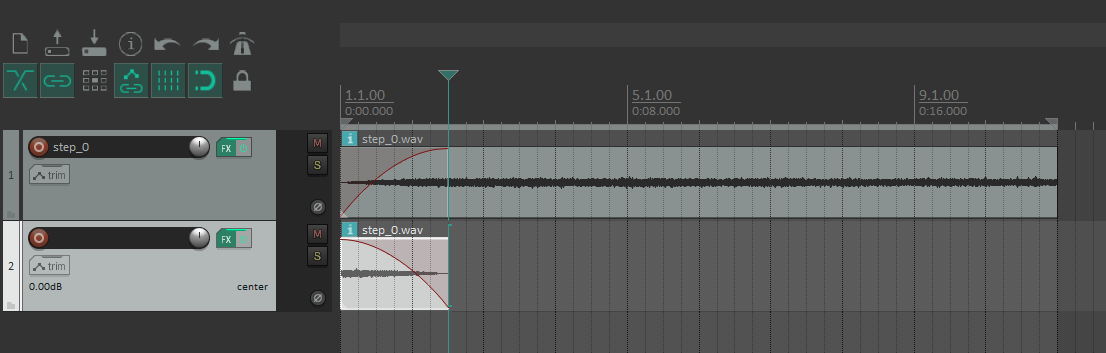
现在让新音轨的结束部分淡出并让第一个音轨的开头部分淡入。
导出
导出带有两个音轨但只有一个声道(单声道)的音频,并为模组中的该 .ogg 文件创建一个新的 SoundEvent。 如果你不确定如何操作,请查阅创建自定义声音页面。
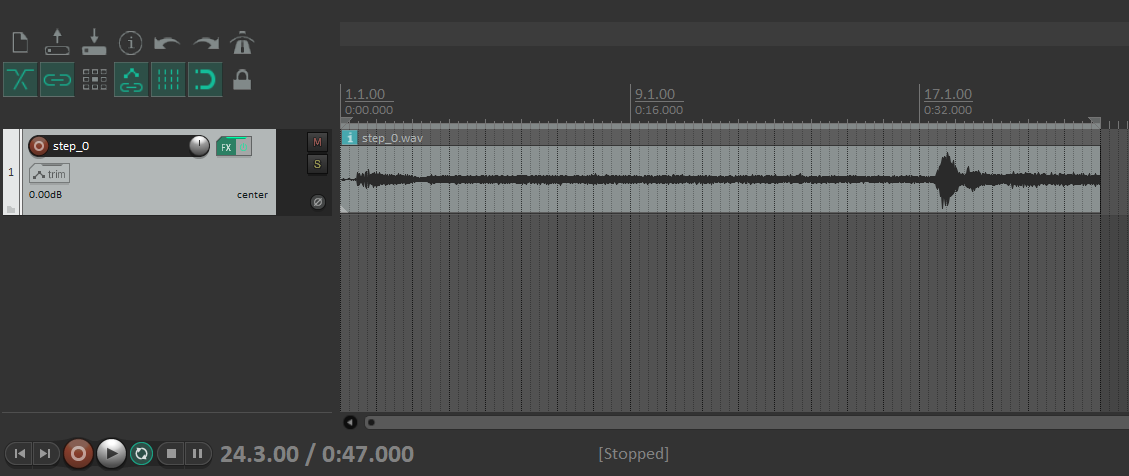
这是名为 ENGINE_LOOP 的 SoundEvent 的完成的循环引擎音频。
使用 SoundInstance
要在客户端播放声音,我们需要一个 SoundInstance。 但其仍然使用 SoundEvent。
如果你只想播放类似于点击 UI 元素的操作,那么已经有现成的 SimpleSoundInstance 类了。
记住,这只会在执行此部分代码的特定客户端上播放。
java
Minecraft client = Minecraft.getInstance();
client.getSoundManager().play(SimpleSoundInstance.forUI(SoundEvents.UI_BUTTON_CLICK, 1.0F));WARNING
请注意,在 SoundInstance 继承自的 AbstractSoundInstance 类中,有 @Environment(EnvType.CLIENT) 注释。
这意味着该类(及其所有子类)将仅对客户端可用。
如果你尝试在逻辑服务器端上下文中使用它,你可能一开始不会注意到单人游戏中的问题, 但多人游戏中的服务器将崩溃,因为它根本无法找到该部分代码。
如果你遇到这些问题,建议你从 在线模板生成器 创建你的模组,并开启 Split client and common sources(拆分客户端和通用源)选项。
SoundInstance 的功能比仅仅播放一次声音更强大。
查看 AbstractSoundInstance 类以及它可以跟踪哪些类型的值。 除了通常的音量和音调变量之外,它还保存 XYZ 坐标,以及在完成 SoundEvent 之后是否应该重复。
接下来看看它的子类 AbstractTickableSoundInstance,我们还引入了 TickableSoundInstance 接口,它为SoundInstance 添加了 ticking 功能。
使用这些工具只需简单地为你的自定义SoundInstance类创建一个新类并继承MovingSoundInstance。
java
public class CustomSoundInstance extends AbstractTickableSoundInstance {
	private final LivingEntity entity;

	public CustomSoundInstance(LivingEntity entity, SoundEvent soundEvent, SoundSource soundCategory) {
		super(soundEvent, soundCategory, SoundInstance.createUnseededRandom());
		// In this constructor we also add the sound source (LivingEntity) of
		// the SoundInstance and store it in the current object
		this.entity = entity;
		// set up default values when the sound is about to start
		this.volume = 1.0f;
		this.pitch = 1.0f;
		this.looping = true;
		this.setPositionToEntity();
	}

	@Override
	public void tick() {
		// stop sound instantly if sound source does not exist anymore
		if (this.entity == null || this.entity.isRemoved() || this.entity.isDeadOrDying()) {
			this.stop();
			return;
		}

		// move sound position over to the new position for every tick
		this.setPositionToEntity();
	}

	@Override
	public boolean canStartSilent() {
		// override to true, so that the SoundInstance can start
		// or add your own condition to the SoundInstance, if necessary
		return true;
	}

	// small utility method to move the sound instance position
	// to the sound source's position
	private void setPositionToEntity() {
		this.x = this.entity.getX();
		this.y = this.entity.getY();
		this.z = this.entity.getZ();
	}
}使用你自定义的Entity或BlockEntity而不是基础的LivingEntity实体会使得你拥有更多控制权,比如tick()方法基于访问器方法, 但你不一定需要一个针对音源的一个引用。 取而代之的是,你可以从其他位置获取BlockPos亦或只是在构造方法中手动设置。
只需记住在SoundInstance中所有的引用对象都是客户端版本的。 在特定情况下,逻辑服务器端实体的属性可能不同于其客户端对应实体。 如果你注意到你的值不一致,请确保你的值与实体的 EntityDataAccessor、BlockEntity 客户端数据包或完整的自定义客户端网络数据包同步。
在你完成自定义 SoundInstance的创建后,只要在客户端使用声音管理器执行了它,就可以在任何地方使用它了。 同样地,你也可以自主停止SoundInstance,如果有必要的话。
java
CustomSoundInstance instance = new CustomSoundInstance(client.player, CustomSounds.ENGINE_LOOP, SoundSource.NEUTRAL);

// play the sound instance
client.getSoundManager().play(instance);

// stop the sound instance
client.getSoundManager().stop(instance);现在,将仅对运行该SoundInstance的客户端播放声音循环。 在这种情况下,声音将遵循 LocalPlayer 本身。
创建和使用简单的自定义 SoundInstance 的说明到此结束。
高级声音实例
WARNING
接下来的内容涵盖高级主题。
在这里,你应该对 Java、面向对象编程、泛型和回调系统有扎实的了解。
了解 Entities、BlockEntities和自定义网络也将对理解高级声音的用例和应用有很大帮助。
为了展示如何创建更精细的SoundInstance系统的示例,我们将添加额外的功能、抽象 以及一些工具,使得在更大的范围内处理声音变得更容易、更动态和更灵活。
理论
先想想看我们最终需要SoundInstance做什么。
- 只要链接的自定义
EngineBlockEntity运行,声音就应该循环播放 SoundInstance可以移动跟随它的自定义EngineBlockEntity'的位置 (BlockEntity不会移动,所以Entities可能会更有用)- 我们需要平缓的转变, 开启或关闭它应该不总是立即的。
- 根据外部因素(例如声音来源)改变音量和音调
总而言之,我们需要跟踪一个自定义 BlockEntity 的实例,在 SoundInstance 运行时,根据该自定义 BlockEntity 的值调整音量和音调,并实现“转变状态”。
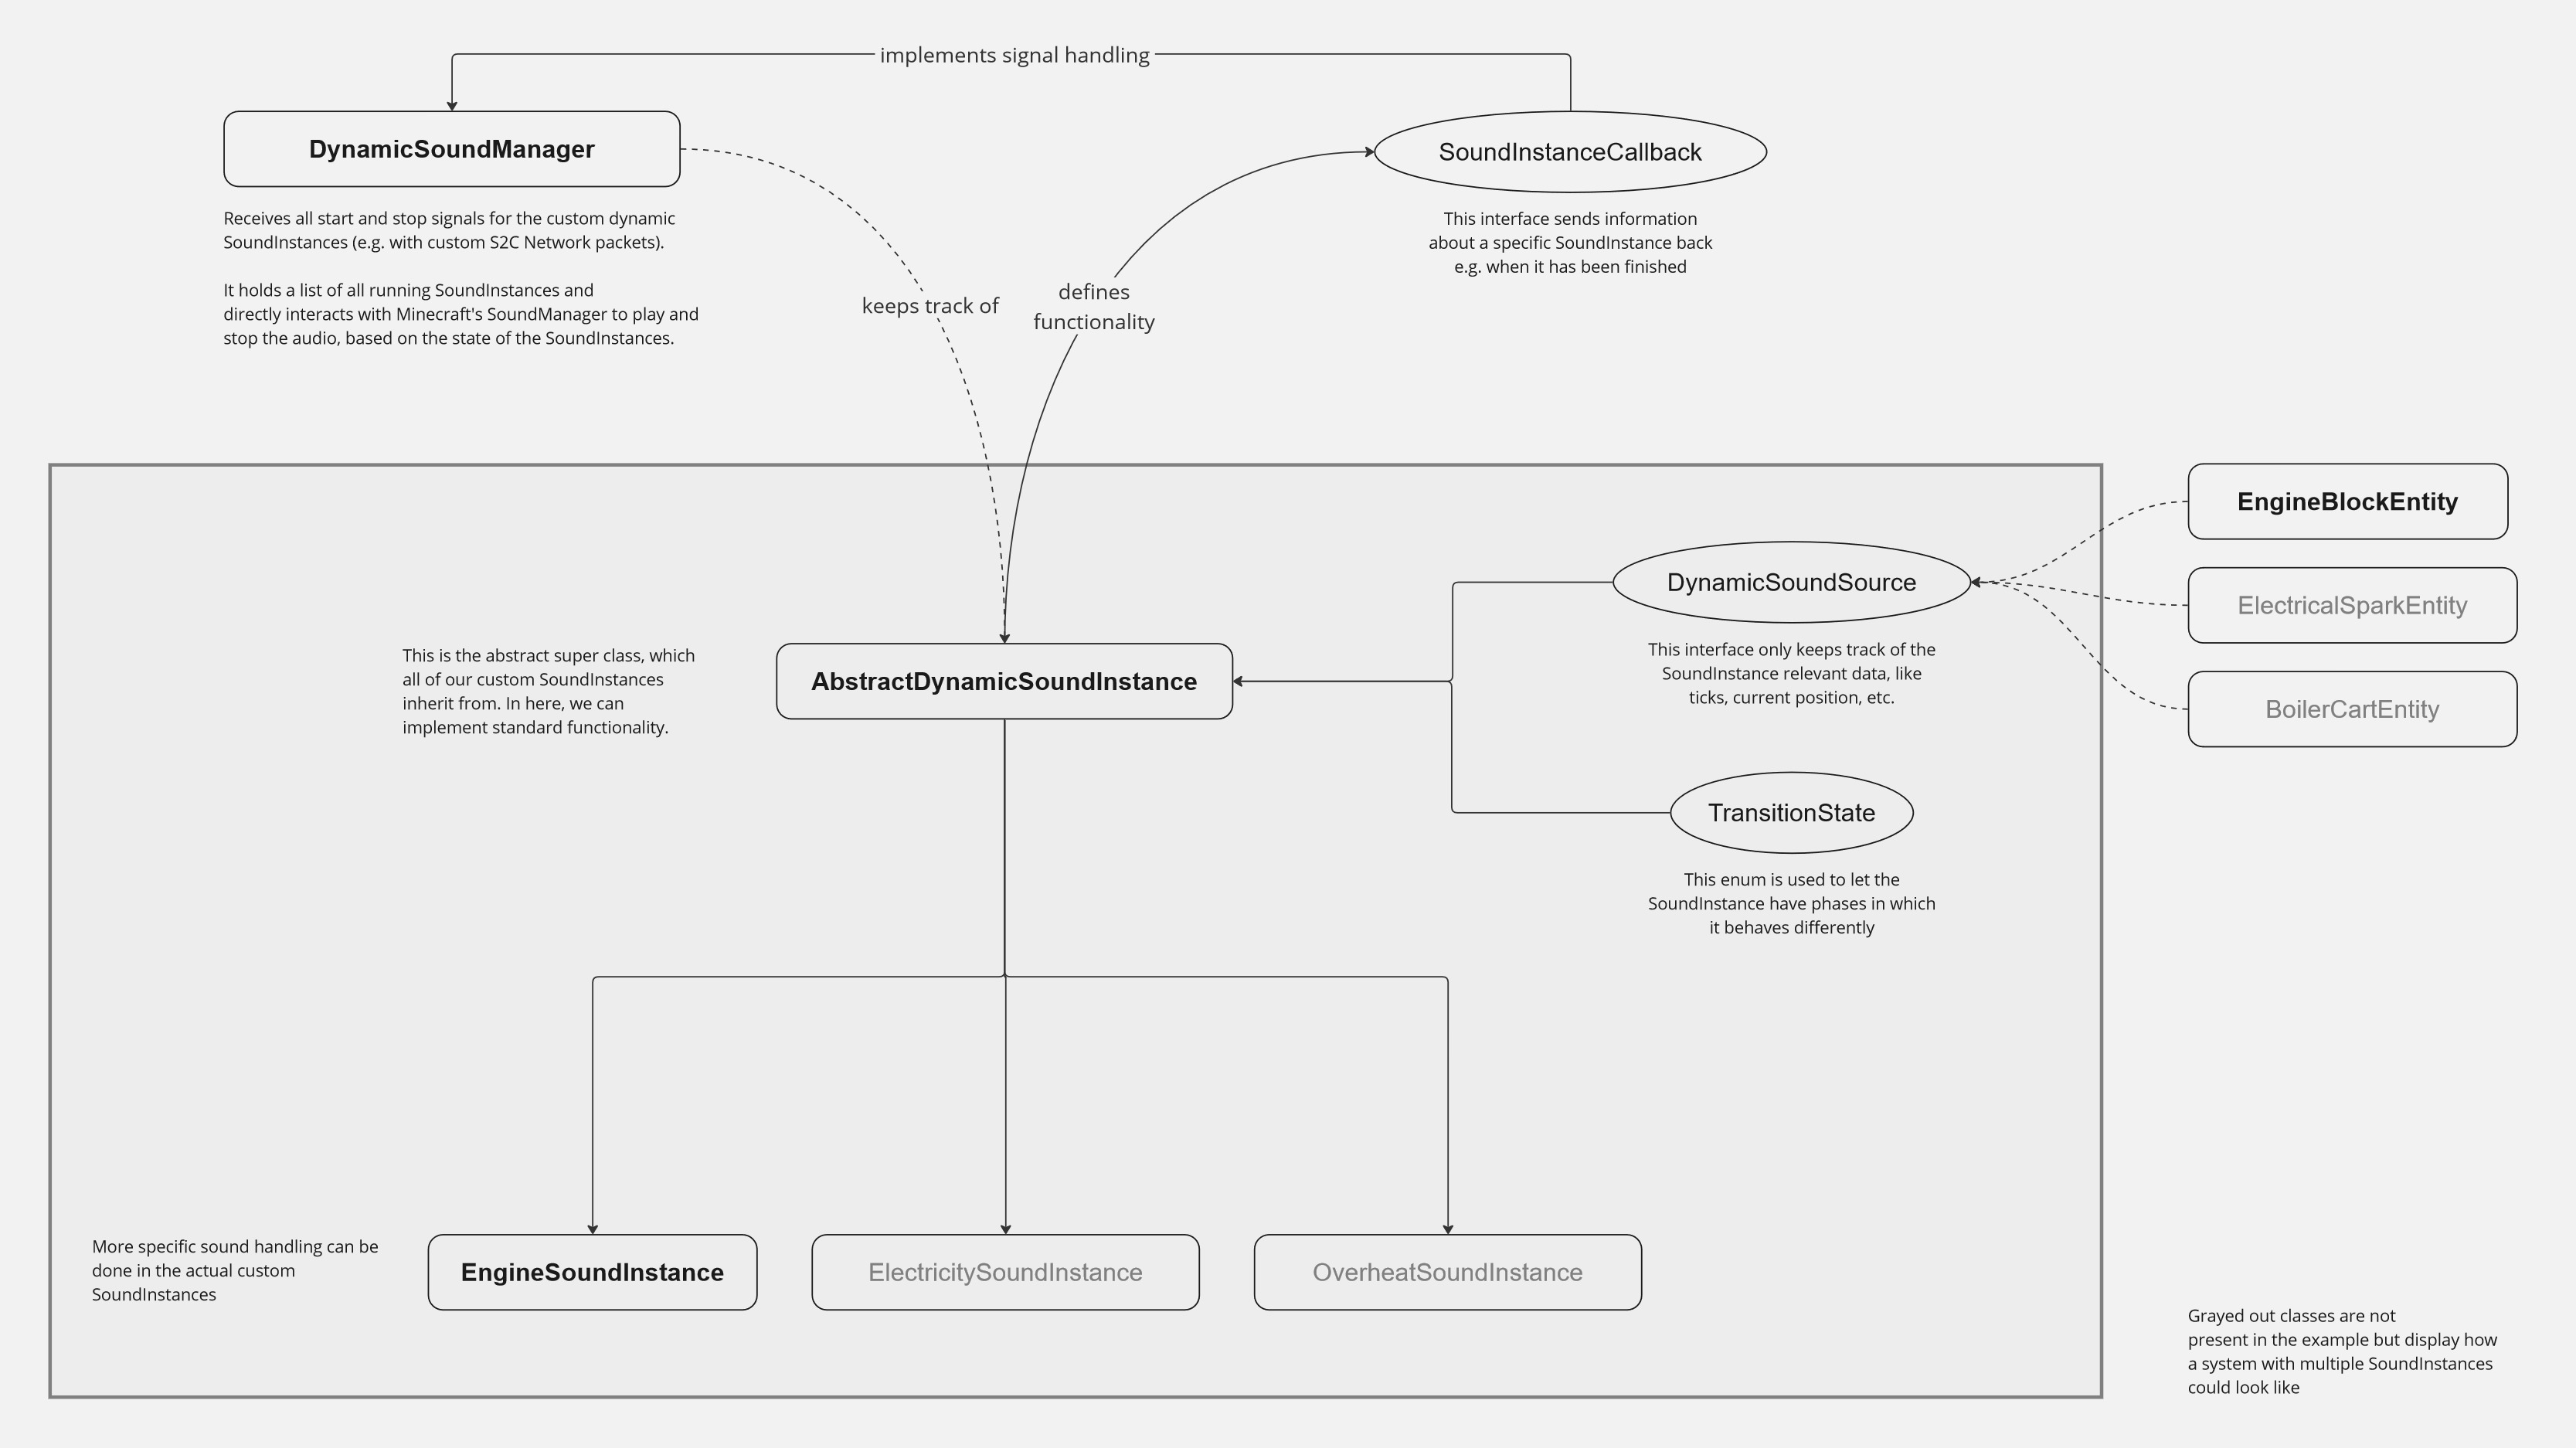
如果你计划创建多个行为不同的 SoundInstances,我建议你创建一个新的抽象类 AbstractDynamicSoundInstance,它实现默认行为,并让实际的自定义 SoundInstance 类从它继承。
如果你只是打算使用一个,可以跳过抽象超类,而是直接在你自定义的 SoundInstance 类中实现该功能。
此外有个集中管理的地方会很有用,直接在那里跟踪,播放以及停止SoundInstance。 这意味着它需要处理传入的信号,比如来自自定义S2C网络数据包的信号,列出所有当前运行的实例,并处理特殊情况,例如哪些声音可以同时播放,以及哪些声音在激活时可能会禁用其他声音。 为此,可以创建一个新的DynamicSoundManager类,以便更轻松地与这个声音系统进行交互。
总的来说在我们完成这个声音系统之后应该就是这样了。
INFO
所有这些枚举、接口和类都是新建的。 以己所需定制这个系统以及工具。 这只是一个教你如何实现的例子。
DynamicSoundSource接口
如果你选择新建一个更模块化的自定义AbstractDynamicSoundInstance类作为父类,建议使其不仅能引用单一类型的Entity,还可以支持不同种类的实体,甚至是BlockEntity。
在这种情况下,利用抽象是关键。 与其直接引用列如自定义的 BlockEntity,不如只跟踪一个提供数据的接口,这样可以解决问题。
从现在开始,我们将使用一个名为DynamicSoundSource的自定义接口。 它被实现在所有要使用动态声音功能的类中,例如自定义的 BlockEntity、实体,甚至使用 Mixin 在已有的类(如 Zombie)中也能实现。 它本质上仅包含声源的必要数据。
java
public interface DynamicSoundSource {
	// gets access to how many ticks have passed for e.g. a BlockEntity instance
	int getTick();

	// gets access to where currently this instance is placed in the world
	Vec3 getPosition();

	// holds a normalized (range of 0-1) value, showing how much stress this instance is currently experiencing
	// It is more or less just an arbitrary value, which will cause the sound to change its pitch while playing.
	float getNormalizedStress();
}创建此接口后,确保在必要的类中也实现它。
INFO
这是一个实用程序,可以在客户端和逻辑服务器端使用。
因此,如果你使用“拆分源”选项,则此接口应存储在通用包中,而不是仅存储在客户端包中。
TransitionState 枚举
如前所述,你可以使用客户端的 SoundManager 停止运行 SoundInstance,但这会导致 SoundInstance 立即静音。 我们的目标是,当停止信号到来时,不要停止声音,而是执行其“过渡状态”的结束阶段。 只有在结束阶段完成后,自定义的 SoundInstance 才应该停止。
TransitionState 是一个新创建的枚举,包含三个值。 它们将用于跟踪声音应该处于哪个阶段。
STARTING阶段:声音开始时无声,但音量缓慢增加RUNNING阶段:声音正常运行ENDING阶段:声音从原始音量开始,然后缓慢减小直至无声
从技术上讲,一个包含各个阶段的简单枚举就足够了。
java
public enum TransitionState {
    STARTING, RUNNING, ENDING
}但是当这些值通过网络发送时,你可能需要为它们定义一个 标识符 或甚至添加其他自定义值。
java
public enum TransitionState {
	STARTING("starting_phase"),
	RUNNING("idle_phase"),
	ENDING("ending_phase");

	private final Identifier identifier;

	TransitionState(String name) {
		this.identifier = Identifier.fromNamespaceAndPath(ExampleMod.MOD_ID, name);
	}

	public Identifier getIdentifier() {
		return this.identifier;
	}
}INFO
再次强调,如果你使用“拆分源”,则需要考虑此枚举将在何处使用。 从技术上讲,只有仅在客户端可用的自定义 SoundInstance 才会使用这些枚举值。
但是,如果此枚举在其他任何地方使用,例如在自定义网络数据包中,则可能还需要将此枚举放入通用包中,而不是仅用于客户端的包中。
SoundInstanceCallback 接口
此接口用作回调。 目前,我们只需要一个 onFinished 方法,但如果你需要从 SoundInstance 对象发送其他信号,你可以添加自己的方法。
java
public interface SoundInstanceCallback {
	// deliver the custom SoundInstance, from which this signal originates,
	// using the method parameters
	<T extends AbstractDynamicSoundInstance> void onFinished(T soundInstance);
}在任何能够处理传入信号的类上实现此接口,例如我们即将创建的AbstractDynamicSoundInstance,并在自定义SoundInstance本身中创建该功能。
AbstractDynamicSoundInstance 类
我们终于开始了解动态 SoundInstance 系统的核心了。 AbstractDynamicSoundInstance 是一个新创建的 abstract 类。 它实现了自定义 SoundInstance 的默认定义功能和实用程序,这些 SoundInstance 将从其继承。
我们可以借鉴之前的 CustomSoundInstance 并对其进行改进。 现在,我们将引用我们的 DynamicSoundSource 而不是 LivingEntity。 此外,我们将定义更多属性。
TransitionState用于跟踪当前阶段- 刻持续时间,表示开始和结束阶段应持续的时间
- 音量和音调的最小值和最大值
- 布尔值,用于通知此实例是否已完成并可以清理
- 刻持有者,用于跟踪当前声音的进度。
- 回调函数,当
SoundInstance实际完成时,向DynamicSoundManager发送信号进行最终清理
java
public abstract class AbstractDynamicSoundInstance extends AbstractTickableSoundInstance {
	protected final DynamicSoundSource soundSource;                 // Entities, BlockEntities, ...
	protected TransitionState transitionState;                      // current TransitionState of the SoundInstance

	protected final int startTransitionTicks, endTransitionTicks;   // duration of starting and ending phases

	// possible volume range when adjusting sound values
	protected final float maxVolume;                                // only max value since the minimum is always 0
	// possible pitch range when adjusting sound values
	protected final float minPitch, maxPitch;

	protected int currentTick = 0, transitionTick = 0;              // current tick values for the instance

	protected final SoundInstanceCallback callback;                 // callback for soundInstance states

	// ...
}然后在抽象类的构造函数中设置自定义 SoundInstance 的默认起始值。
java
// ...

// set up default settings of the SoundInstance in this constructor
protected AbstractDynamicSoundInstance(DynamicSoundSource soundSource, SoundEvent soundEvent, SoundSource soundCategory,
									int startTransitionTicks, int endTransitionTicks, float maxVolume, float minPitch, float maxPitch,
									SoundInstanceCallback callback) {
	super(soundEvent, soundCategory, SoundInstance.createUnseededRandom());

	// store important references to other objects
	this.soundSource = soundSource;
	this.callback = callback;

	// store the limits for the SoundInstance
	this.maxVolume = maxVolume;
	this.minPitch = minPitch;
	this.maxPitch = maxPitch;
	this.startTransitionTicks = startTransitionTicks;    // starting phase duration
	this.endTransitionTicks = endTransitionTicks;        // ending phase duration

	// set start values
	this.volume = 0.0f;
	this.pitch = minPitch;
	this.looping = true;
	this.transitionState = TransitionState.STARTING;
	this.setPositionToEntity();
}

// ...构造函数完成后,你需要允许 SoundInstance 能够播放。
java
@Override
public boolean canStartSilent() {
	// override to true, so that the SoundInstance can start
	// or add your own condition to the SoundInstance, if necessary
	return true;
}现在到了这个动态 SoundInstance 的重要部分。 根据实例的当前刻,它可以应用不同的值和行为。
java
@Override
public void tick() {
	// handle states where sound might be actually stopped instantly
	if (this.soundSource == null) {
		this.callback.onFinished(this);
	}

	// basic tick behaviour
	this.currentTick++;
	this.setPositionToEntity();

	// SoundInstance phase switching
	switch (this.transitionState) {
		case STARTING -> {
			this.transitionTick++;

			// go into next phase if starting phase finished its duration
			if (this.transitionTick > this.startTransitionTicks) {
				this.transitionTick = 0;	// reset tick for future ending phase
				this.transitionState = TransitionState.RUNNING;
			}
		}
		case ENDING -> {
			this.transitionTick++;

			// set SoundInstance as finished if ending phase finished its duration
			if (this.transitionTick > this.endTransitionTicks) {
				this.callback.onFinished(this);
			}
		}
	}

	// apply volume and pitch modulation here,
	// if you use a normal SoundInstance class
}如你所见,我们尚未在此处应用音量和音调调制。 我们只应用共享行为。 因此,在这个 AbstractDynamicSoundInstance 类中,我们仅为子类提供基本结构和工具,子类可以自行决定实际要应用哪种声音调制。
让我们看一些此类声音调制方法的示例。
java
// increase or decrease volume and pitch based on the current phase of the sound
protected void modulateSoundForTransition() {
	float normalizedTick = switch (this.transitionState) {
		case STARTING -> (float) this.transitionTick / this.startTransitionTicks;
		case ENDING -> 1.0f - ((float) this.transitionTick / this.endTransitionTicks);
		default -> 1.0f;
	};

	this.volume = Mth.lerp(normalizedTick, 0.0f, this.maxVolume);
}

// increase or decrease pitch based on the sound source's stress value
protected void modulateSoundForStress() {
	this.pitch = Mth.lerp(this.soundSource.getNormalizedStress(), this.minPitch, this.maxPitch);
}如你所见,归一化值与线性插值 (lerp) 相结合有助于将值调整到理想的音频限值。 请记住,如果你添加了多个更改同一值的方法,则需要观察并调整它们之间的协作方式。
现在我们只需添加其余的实用方法,AbstractDynamicSoundInstance 类就完成了。
java
// moves the sound instance position to the sound source's position
protected void setPositionToEntity() {
	this.x = this.soundSource.getPosition().x();
	this.y = this.soundSource.getPosition().y();
	this.z = this.soundSource.getPosition().z();
}

// Sets the SoundInstance into its ending phase.
// This is especially useful for external access to this SoundInstance
public void end() {
	this.transitionState = TransitionState.ENDING;
}SoundInstance 实现示例
如果我们看一下实际的自定义 SoundInstance 类(它扩展自新创建的 AbstractDynamicSoundInstance),我们只需要考虑什么条件会使声音停止以及我们想要应用什么声音调制。
java
public class EngineSoundInstance extends AbstractDynamicSoundInstance {
	// Here we just use the default constructor parameters.
	// If you want to specifically set values here already,
	// you can clean up the constructor parameters a bit
	public EngineSoundInstance(DynamicSoundSource soundSource, SoundEvent soundEvent, SoundSource soundCategory,
							int startTransitionTicks, int endTransitionTicks, float maxVolume, float minPitch, float maxPitch,
							SoundInstanceCallback callback) {
		super(soundSource, soundEvent, soundCategory, startTransitionTicks, endTransitionTicks, maxVolume, minPitch, maxPitch, callback);
	}

	@Override
	public void tick() {
		// check conditions which set this sound automatically into the ending phase
		if (soundSource instanceof EngineBlockEntity blockEntity && blockEntity.isRemoved()) {
			this.end();
		}

		// apply the default tick behaviour from the parent class
		super.tick();

		// modulate volume and pitch of the SoundInstance
		this.modulateSoundForTransition();
		this.modulateSoundForStress();
	}

	// you can also add sound modulation methods here,
	// which should be only accessible to this
	// specific SoundInstance
}DynamicSoundManager 类
我们之前讨论了如何播放和停止 SoundInstance。 为了清理、集中和管理这些交互,你可以创建自己的 SoundInstance 处理程序,该处理程序基于此构建。
这个新的 DynamicSoundManager 类将管理自定义的 SoundInstance,因此它也仅供客户端使用。 此外,客户端应该只允许此类的一个实例存在。 单个客户端使用多个声音管理器意义不大,而且会使交互更加复杂。 因此,我们使用“单例设计模式”。
java
public class DynamicSoundManager implements SoundInstanceCallback {
	// An instance of the client to use Minecraft's default SoundManager
	private static final Minecraft client = Minecraft.getInstance();
	// static field to store the current instance for the Singleton Design Pattern
	private static DynamicSoundManager instance;
	// The list which keeps track of all currently playing dynamic SoundInstances
	private final List<AbstractDynamicSoundInstance> activeSounds = new ArrayList<>();

	private DynamicSoundManager() {
		// private constructor to make sure that the normal
		// instantiation of that object is not used externally
	}

	// when accessing this class for the first time a new instance
	// is created and stored. If this is called again only the already
	// existing instance will be returned, instead of creating a new instance
	public static DynamicSoundManager getInstance() {
		if (instance == null) {
			instance = new DynamicSoundManager();
		}

		return instance;
	}

	// This is where the callback signal of a finished custom SoundInstance will arrive.
	// For now, we can just stop and remove the sound from the list, but you can add
	// your own functionality too
	@Override
	public <T extends AbstractDynamicSoundInstance> void onFinished(T soundInstance) {
		this.stop(soundInstance);
	}
}在正确完成基本结构后,你可以添加与声音系统交互所需的方法。
- 播放声音
- 停止声音
- 检查声音是否正在播放
java
// Plays a sound instance, if it doesn't already exist in the list
public <T extends AbstractDynamicSoundInstance> void play(T soundInstance) {
	if (this.activeSounds.contains(soundInstance)) return;

	client.getSoundManager().play(soundInstance);
	this.activeSounds.add(soundInstance);
}

// Stops a sound immediately. in most cases it is preferred to use
// the sound's ending phase, which will clean it up after completion
public <T extends AbstractDynamicSoundInstance> void stop(T soundInstance) {
	client.getSoundManager().stop(soundInstance);
	this.activeSounds.remove(soundInstance);
}

// Finds a SoundInstance from a SoundEvent, if it exists and is currently playing
public Optional<AbstractDynamicSoundInstance> getPlayingSoundInstance(SoundEvent soundEvent) {
	for (var activeSound : this.activeSounds) {
		// SoundInstances use their SoundEvent's id by default
		if (activeSound.getIdentifier().equals(soundEvent.location())) {
			return Optional.of(activeSound);
		}
	}

	return Optional.empty();
}除了拥有所有当前正在播放的 SoundInstance 列表之外,你还可以跟踪哪些声源正在播放哪些声音。 例如,一个引擎同时播放两种引擎声音是没有意义的,而多个引擎同时播放各自的引擎声音则是一种有效的极端情况。 为了简单起见,我们只创建了一个 List<AbstractDynamicSoundInstance>,但在许多情况下,DynamicSoundSource 和 AbstractDynamicSoundInstance 的 HashMap 可能是更好的选择。
使用高级声音系统
要使用此声音系统,只需使用 DynamicSoundManager 方法或 SoundInstance 方法即可。 现在,你可以使用实体中的 onStartedTrackingBy 和 onStoppedTrackingBy 方法,或者使用自定义客户端绑定网络,来启动和停止你的自定义动态 SoundInstance。
java
private static void handleClientboundEngineSoundPacket(EngineSoundInstancePacket packet, ClientPlayNetworking.Context context) {
	ClientLevel level = context.client().level;
	if (level == null) return;

	DynamicSoundManager soundManager = DynamicSoundManager.getInstance();

	if (level.getBlockEntity(packet.blockEntityPos()) instanceof EngineBlockEntity engineBlockEntity) {
		if (packet.shouldStart()) {
			soundManager.play(new EngineSoundInstance(engineBlockEntity,
					CustomSounds.ENGINE_LOOP, SoundSource.BLOCKS,
					60, 30, 1.2f, 0.8f, 1.4f,
					soundManager)
			);

			return;
		}
	}

	if (!packet.shouldStart()) {
		soundManager.getPlayingSoundInstance(CustomSounds.ENGINE_LOOP).ifPresent(AbstractDynamicSoundInstance::end);
	}
}最终产品可以根据声音相位调整音量,使过渡更加平滑,并根据来自声源的压力值改变音调。
你可以为声源添加另一个值,用于跟踪“过热”值,此外,如果该值大于 0,则让嘶嘶作响的 SoundInstance 缓慢淡入,或者为自定义动态 SoundInstance 添加一个新接口,为声音类型分配优先级值,以便在声音相互碰撞时选择播放哪种声音。
使用当前系统,可以轻松地同时处理多个 SoundInstance,并根据你的需求设计音频。