容器菜单 26.1.2
讲解如何为容器方块创建简单菜单的指南。
前置条件
你 应该首先阅读方块容器以熟悉如何创建容器方块实体。
打开容器(例如箱子)时,主要需要两样东西才能显示其中的内容:
- 一个负责将内容和背景渲染到显示器上的
Screen。 - 一个处理 Shift 点击逻辑以及服务器和客户端之间同步的
Menu。
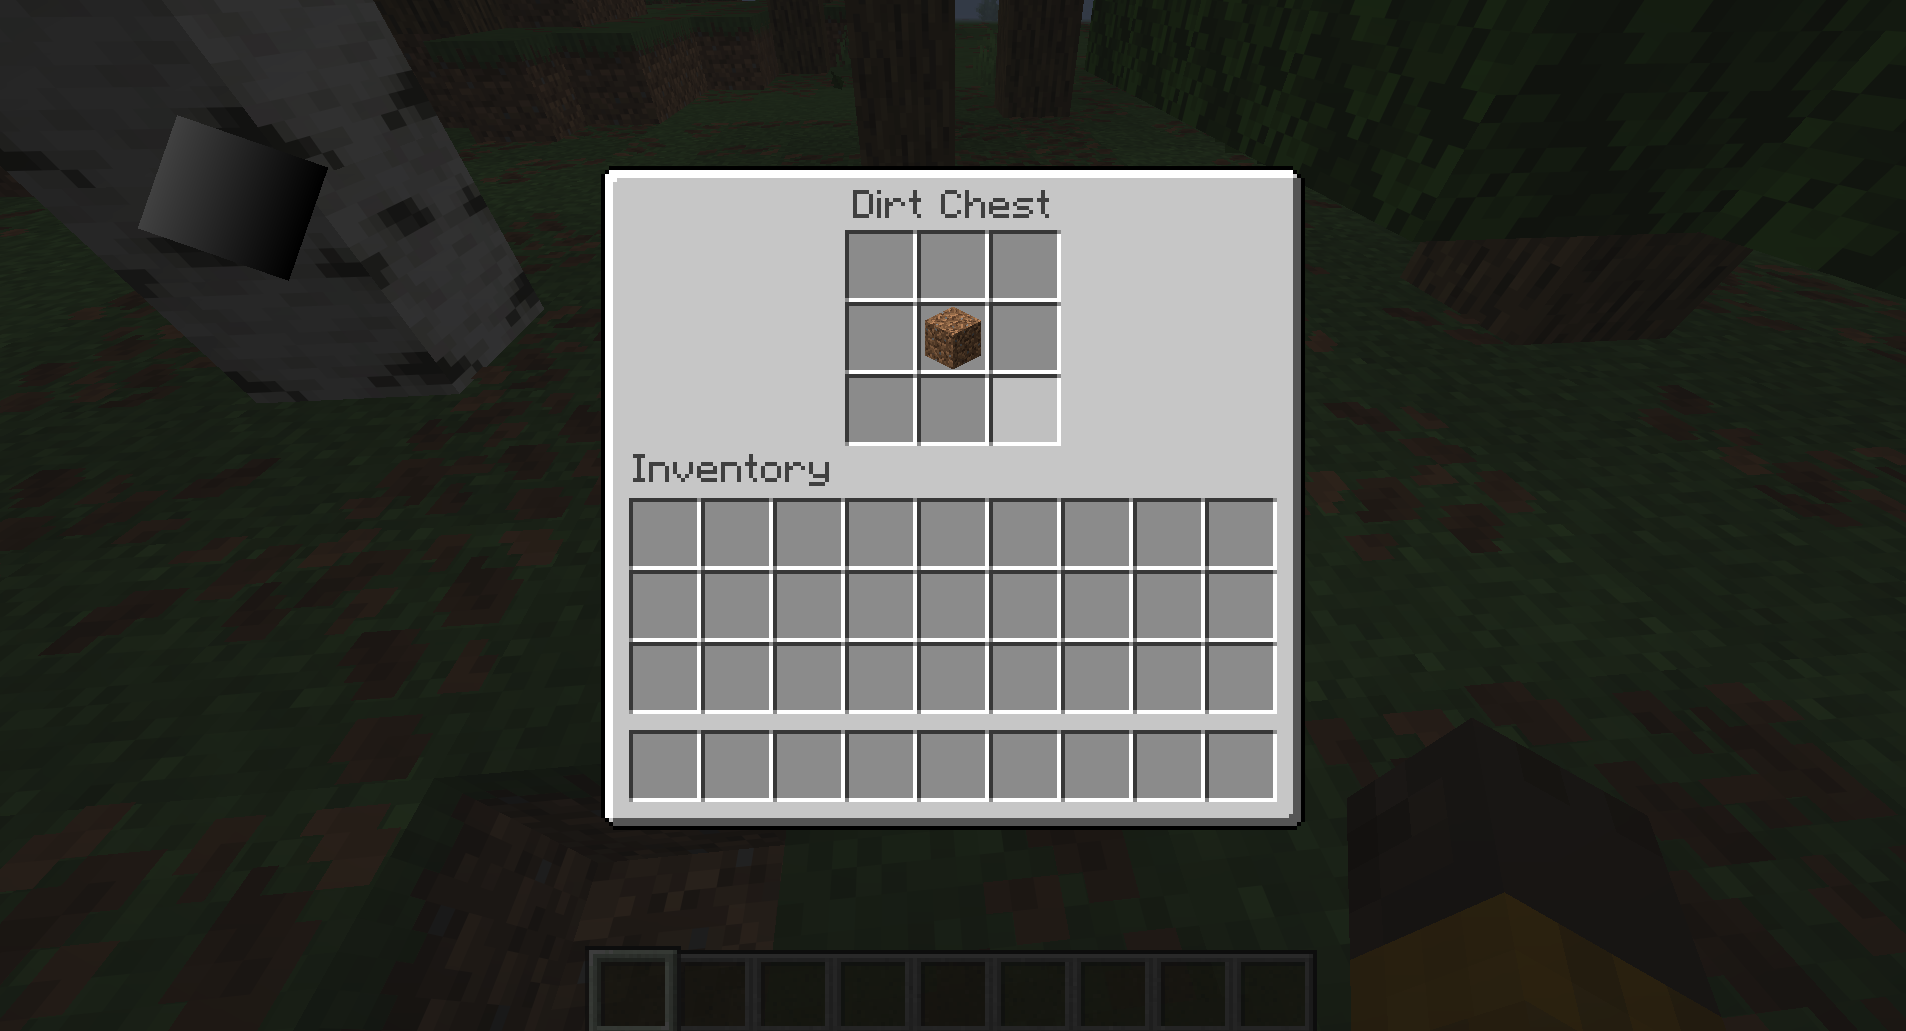
在本指南中,我们将创建一个泥土箱子,其中包含一个 3x3 的容器,可以通过右键单击并打开屏幕来访问容器。
创建方块
首先,我们要创建一个方块和方块实体;请阅读方块容器指南进一步了解。
java
public class DirtChestBlock extends BaseEntityBlock {
	@Override
	public @Nullable BlockEntity newBlockEntity(BlockPos pos, BlockState state) {
		return new DirtChestBlockEntity(pos, state);
	}
	// ...
}java
public class DirtChestBlockEntity extends BlockEntity implements ImplementedContainer {
	public static final int CONTAINER_SIZE = 3 * 3;
	private final NonNullList<ItemStack> items = NonNullList.withSize(CONTAINER_SIZE, ItemStack.EMPTY);

	// ...
}除了普通的方块实体方法之外,我们还需要重写 stillValid 方法。 此方法将在每个游戏帧调用一次,以检查是否应强制玩家退出菜单。 我们将使用 ContainerHelper 中此方法的默认实现,它会检查我们的方块实体是否仍存在以及玩家是否在交互范围内。
java
@Override
public boolean stillValid(Player player) {
	return Container.stillValidBlockEntity(this, player);
}菜单实现后,当玩家被推离时,菜单将自动关闭。
打开菜单
我们希望能够以某种方式打开菜单,因此我们将在 useWithoutItem 方法中处理这个问题:
java
@Override
protected InteractionResult useWithoutItem(BlockState state, Level level, BlockPos pos, Player player, BlockHitResult hit) {
	if (!level.isClientSide() && level.getBlockEntity(pos) instanceof DirtChestBlockEntity dirtChest) {
		player.openMenu(dirtChest);
	}

	return InteractionResult.SUCCESS;
}实现 MenuProvider
为了添加菜单功能,我们现在需要在方块实体中实现 MenuProvider:
java
public class DirtChestBlockEntity extends BlockEntity implements ImplementedContainer, MenuProvider {
	@Override
	@NonNull
	public Component getDisplayName() {
		return Component.translatable("block.example-mod.dirt_chest");
	}

	@Override
	public @Nullable AbstractContainerMenu createMenu(int containerId, Inventory inventory, Player player) {
		return null;
	}
	// ...
}getDisplayName 方法返回方块的名称,将显示在屏幕顶部。
创建菜单
createMenu 要求我们返回一个菜单,但我们还没有为我们的方块创建菜单。 为此,我们将创建一个继承自 AbstractContainerMenu 的 DirtChestMenu 类:
java
public class DirtChestMenu extends AbstractContainerMenu {
	private static final int SLOTS_ROWS = 3;
	private static final int SLOTS_COLUMNS = 3;
	private static final int SLOTS_COUNT = SLOTS_ROWS * SLOTS_COLUMNS;

	private static final int CONTAINER_START = 0;
	private static final int CONTAINER_END = SLOTS_COUNT;
	private static final int INVENTORY_START = CONTAINER_END;
	private static final int INVENTORY_END = INVENTORY_START + Inventory.INVENTORY_SIZE;

	private static final int CONTAINER_START_X = 62;
	private static final int CONTAINER_START_Y = 17;
	private static final int INVENTORY_START_X = 8;
	private static final int INVENTORY_START_Y = 84;

	private final Container container;

	// Client-side constructor
	public DirtChestMenu(final int containerId, final Inventory inventory) {
		this(containerId, inventory, new SimpleContainer(SLOTS_COUNT));
	}

	// Server-side constructor
	public DirtChestMenu(final int containerId, final Inventory inventory, final Container container) {
		super(ModMenuType.DIRT_CHEST, containerId);
		checkContainerSize(container, SLOTS_COUNT);
		this.container = container;

		// Some containers do custom logic when opened by a player.
		container.startOpen(inventory.player);

		// Add the slots for our container in a 3x3 grid.
		this.add3x3GridSlots();

		// Add the player inventory slots.
		this.addStandardInventorySlots(inventory, INVENTORY_START_X, INVENTORY_START_Y);
	}

	private void add3x3GridSlots() {
		for (int y = 0; y < SLOTS_ROWS; y++) {
			for (int x = 0; x < SLOTS_COLUMNS; x++) {
				final int slot = x + y * SLOTS_COLUMNS;
				this.addSlot(new Slot(
								this.container,
								slot,
								CONTAINER_START_X + x * SLOT_SIZE,
								CONTAINER_START_Y + y * SLOT_SIZE
				));
			}
		}
	}

	@Override
	public ItemStack quickMoveStack(Player player, int slotIndex) {
		Slot slot = this.slots.get(slotIndex);

		if (!slot.hasItem()) {
			return ItemStack.EMPTY;
		}

		ItemStack stack = slot.getItem();
		ItemStack clicked = stack.copy();

		if (slotIndex < CONTAINER_END) {
			// If the clicked slot is in the container, try moving the item to the player inventory.
			// When moving into the player's inventory, we iterate over slots in a reversed order; starting from the last hotbar slot to the first inventory slot.
			if (!this.moveItemStackTo(stack, INVENTORY_START, INVENTORY_END, /* backwards: */ true)) {
				return ItemStack.EMPTY;
			}
		} else {
			// Else, move the item from the player inventory to the container.
			if (!this.moveItemStackTo(stack, CONTAINER_START, CONTAINER_END, /* backwards: */ false)) {
				return ItemStack.EMPTY;
			}
		}

		if (stack.isEmpty()) {
			slot.setByPlayer(ItemStack.EMPTY);
		} else {
			slot.setChanged();
		}

		return clicked;
	}

	@Override
	public boolean stillValid(Player player) {
		return this.container.stillValid(player);
	}

	@Override
	public void removed(Player player) {
		super.removed(player);
		this.container.stopOpen(player);
	}
}当服务器想要打开菜单时,客户端构造函数就会被调用。 它会创建一个空容器,然后该容器会自动与服务器上的实际容器同步。
服务端构造函数在服务器上被调用,因为它知道容器的内容,所以可以直接将其作为参数传递。
quickMoveStack 处理菜单中按住 Shift 键点击的物品。 这个示例复现了原版菜单(如箱子和发射器)的行为。
然后我们需要在一个新的 ModMenuType 类中注册菜单:
java
public class ModMenuType {
	public static final MenuType<DirtChestMenu> DIRT_CHEST = register("dirt_chest", DirtChestMenu::new);

	public static <T extends AbstractContainerMenu> MenuType<T> register(
					String name,
					MenuType.MenuSupplier<T> constructor
	) {
		return Registry.register(BuiltInRegistries.MENU, name, new MenuType<>(constructor, FeatureFlagSet.of()));
	}
}现在我们可以将方块实体中的 createMenu 的返回值设置为使用我们的菜单:
java
@Override
public @Nullable AbstractContainerMenu createMenu(int containerId, Inventory inventory, Player player) {
	return new DirtChestMenu(containerId, inventory, this);
}INFO
createMenu 方法只会在服务端调用,所以我们调用服务端构造函数,并将 this(方块实体)作为容器参数传递。
创建屏幕
为了在客户端实际显示容器的内容,我们还需要为菜单创建一个屏幕。 我们将创建一个继承自 AbstractContainerScreen 的新类:
java
public class DirtChestScreen extends AbstractContainerScreen<DirtChestMenu> {
	private static final Identifier CONTAINER_TEXTURE = Identifier.withDefaultNamespace("textures/gui/container/dispenser.png");

	public DirtChestScreen(DirtChestMenu abstractContainerMenu, Inventory inventory, Component component) {
		super(abstractContainerMenu, inventory, component);
		// Center the title
		this.titleLabelX = (this.imageWidth - this.font.width(this.title)) / 2;
	}

	@Override
	public void extractBackground(GuiGraphicsExtractor graphics, int mouseX, int mouseY, float delta) {
		super.extractBackground(graphics, mouseX, mouseY, delta);
		graphics.blit(RenderPipelines.GUI_TEXTURED, CONTAINER_TEXTURE, this.leftPos, this.topPos, 0.0F, 0.0F, this.imageWidth, this.imageHeight, BACKGROUND_TEXTURE_WIDTH, BACKGROUND_TEXTURE_HEIGHT);
	}
}对于这个屏幕的背景,我们直接使用了默认的发射器屏幕纹理,因为我们的泥土箱子使用相同的槽位布局。 或者,你 也可以为 CONTAINER_TEXTURE 提供自己的纹理。
因为这是一个菜单屏幕,所以我们还需要使用 MenuScreens#register() 方法在客户端注册它:
java
public class ExampleModScreens implements ClientModInitializer {
	@Override
	public void onInitializeClient() {
		MenuScreens.register(ModMenuType.DIRT_CHEST, DirtChestScreen::new);
	}
}游戏加载完毕后,你应该会看到一个泥土箱子,右键点击即可打开菜单并将物品存放其中。