Basic Rendering Concepts 26.1.2
Learn about the basic concepts of rendering using Minecraft's rendering engine.
WARNING
Although Minecraft is currently built using OpenGL, as of version 1.17+ you cannot use legacy OpenGL methods to render your own things. Instead, you must use the new BufferBuilder system, which formats rendering data and uploads it to OpenGL to draw.
To summarize, you have to use Minecraft's rendering system. Use of raw OpenGL will break even further when Minecraft 26.2 releases with a Vulkan backend.
IMPORTANT UPDATE
Starting from 1.21.6, large changes are being implemented to the rendering pipeline, such as moving towards RenderTypes and RenderPipelines and more importantly, RenderStates, with the ultimate goal of being able to prepare the next frame while drawing the current frame. In the "preparation" phase, all game data used for rendering is extracted to RenderStates, so another thread can work on drawing that frame while the next frame is being extracted.
For example, in 1.21.8 GUI rendering adopted this model, and GuiGraphicsExtractor methods simply add to the render state. The actual uploading to the BufferBuilder happens at the end of the preparation phase, after all elements have been added to the RenderState. See GuiRenderer#prepare.
This article covers the basics of rendering and, while still somewhat relevant, most times there are higher levels of abstractions for better performance and compatibility. For more information, see Rendering in the World.
This page will cover the basics of rendering using the new system, going over key terminology and concepts.
Although much of rendering in Minecraft is abstracted through the various GuiGraphicsExtractor methods, and you'll likely not need to touch anything mentioned here, it's still important to understand the basics of how rendering works.
The Tesselator
The Tesselator is the main class used to render things in Minecraft. It is a singleton, meaning that there is only one instance of it in the game. You can get the instance using Tesselator.getInstance().
The BufferBuilder
The BufferBuilder is the class used to format and upload rendering data to OpenGL. It is used to create a buffer, which is then uploaded to OpenGL to draw.
The Tesselator is used to create a BufferBuilder, which is used to format and upload rendering data to OpenGL.
Initializing the BufferBuilder
Before you can write anything to the BufferBuilder, you must initialize it. This is done using Tesselator#begin(...) method, which takes in a VertexFormat and a draw mode and returns a BufferBuilder.
Vertex Formats
The VertexFormat defines the elements that we include in our data buffer and outlines how these elements should be transmitted to OpenGL.
The following default VertexFormat elements are available at DefaultVertexFormat:
| Element | Format |
|---|---|
EMPTY | { } |
BLOCK | { position, color, texture uv, texture light (2 shorts), texture normal (3 sbytes) } |
NEW_ENTITY | { position, color, texture uv, overlay (2 shorts), texture light, normal (3 sbytes) } |
PARTICLE | { position, texture uv, color, texture light } |
POSITION | { position } |
POSITION_COLOR | { position, color } |
POSITION_COLOR_NORMAL | { position, color, normal } |
POSITION_COLOR_LIGHTMAP | { position, color, light } |
POSITION_TEX | { position, uv } |
POSITION_TEX_COLOR | { position, uv, color } |
POSITION_COLOR_TEX_LIGHTMAP | { position, color, uv, light } |
POSITION_TEX_LIGHTMAP_COLOR | { position, uv, light, color } |
POSITION_TEX_COLOR_NORMAL | { position, uv, color, normal } |
Draw Modes
The draw mode defines how the data is drawn. The following draw modes are available at VertexFormat.Mode:
| Draw Mode | Description |
|---|---|
LINES | Each element is made up of 2 vertices and is represented as a single line. |
LINE_STRIP | The first element requires 2 vertices. Additional elements are drawn with just 1 new vertex, creating a continuous line. |
DEBUG_LINES | Similar to Mode.LINES, but the line is always exactly one pixel wide on the screen. |
DEBUG_LINE_STRIP | Same as Mode.LINE_STRIP, but lines are always one pixel wide. |
TRIANGLES | Each element is made up of 3 vertices, forming a triangle. |
TRIANGLE_STRIP | Starts with 3 vertices for the first triangle. Each additional vertex forms a new triangle with the last two vertices. |
TRIANGLE_FAN | Starts with 3 vertices for the first triangle. Each additional vertex forms a new triangle with the first vertex and the last vertex. |
QUADS | Each element is made up of 4 vertices, forming a quadrilateral. |
Writing to the BufferBuilder
Once the BufferBuilder is initialized, you can write data to it.
The BufferBuilder allows us to construct our buffer, vertex by vertex. To add a vertex, we use the buffer.addVertex(Matrix4f, float, float, float) method. The Matrix4f parameter is the transformation matrix, which we'll discuss in more detail later. The three float parameters represent the (x, y, z) coordinates of the vertex position.
This method returns a vertex builder, which we can use to specify additional information for the vertex. It's crucial to follow the order of our defined VertexFormat when adding this information. If we don't, OpenGL might not interpret our data correctly. After we've finished building a vertex, just continue adding more vertices and data to the buffer until you're done.
It's also worth understanding the concept of culling. Culling is the process of removing faces of a 3D shape that aren't visible from the viewer's perspective. If the vertices for a face are specified in the wrong order, the face might not render correctly due to culling.
What Is a Transformation Matrix?
A transformation matrix is a 4x4 matrix that is used to transform a vector. In Minecraft, the transformation matrix is just transforming the coordinates we give into the addVertex call. The transformations can scale our model, move it around and rotate it.
It's sometimes referred to as a position matrix, or a model matrix.
It's usually obtained via the Matrix3x2fStack class, which can be obtained via the GuiGraphicsExtractor object by calling the GuiGraphicsExtractor#pose() method.
Rendering a Triangle Strip
It's easier to explain how to write to the BufferBuilder using a practical example. Let's say we want to render something using the VertexFormat.Mode.TRIANGLE_STRIP draw mode and the POSITION_COLOR vertex format.
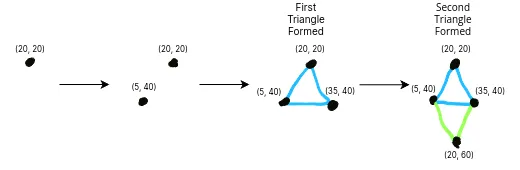
We're going to draw vertices at the following points on the HUD (in order):
text
(20, 20)
(5, 40)
(35, 40)
(20, 60)
This should give us a lovely diamond - since we're using the TRIANGLE_STRIP draw mode, the renderer will perform the following steps:
Since we're drawing on the HUD in this example, we'll use the HudElementRegistry:
IMPORTANT UPDATE
Starting from 1.21.8, the matrix stack passed for HUD rendering has been changed from PoseStack to Matrix3x2fStack. Most methods are slightly different and no longer take a z parameter, but the concepts are the same.
Additionally, the code below does not fully match the explanation above: you do not need to manually write to the BufferBuilder, because GuiGraphicsExtractor methods automatically write to the HUD's BufferBuilder during preparation.
Read the important update above for more information.
Element registration:
java
HudElementRegistry.addLast(Identifier.fromNamespaceAndPath(ExampleMod.MOD_ID, "last_element"), this.hudLayer());Implementation of hudLayer():
java
private HudElement hudLayer() {
	return (graphics, deltaTracker) -> {
		Matrix3x2fStack matrices = graphics.pose();

		// Store the total tick delta in a field, so we can use it later.
		this.totalTickProgress += deltaTracker.getGameTimeDeltaPartialTick(true);

		// Push a new matrix onto the stack.
		matrices.pushMatrix();

		// Scale the matrix by 0.5 to make the triangle smaller and larger over time.
		float scaleAmount = Mth.sin(this.totalTickProgress / 10F) / 2F + 1.5F;

		// Apply the scaling amount to the matrix.
		// We don't need to scale the Z axis since it's on the HUD and 2D.
		matrices.scale(scaleAmount, scaleAmount);
		matrices.scale(1 / scaleAmount, 1 / scaleAmount);
		matrices.translate(60f, 60f);
		// Lerp between 0 and 360 degrees over time.
		float rotationAmount = this.totalTickProgress / 50F % 360;
		matrices.rotate(rotationAmount);
		// Shift entire square so that it rotates in its center.
		matrices.translate(-20f, -40f);
		// We do not need to manually write to the buffer. GuiGraphics methods write to GUI buffer in `GuiRenderer` at the end of preparation.

		// Pop our matrix from the stack.
		matrices.popMatrix();
	};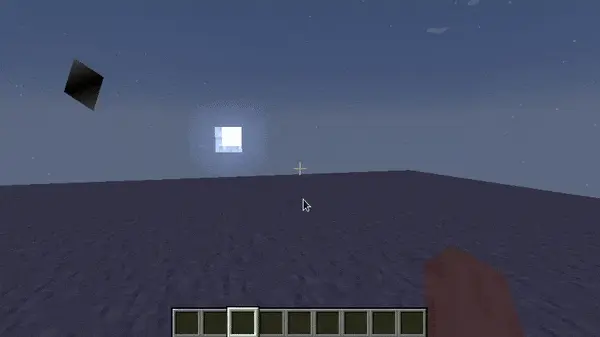
}This results in the following being drawn on the HUD:
TIP
Try mess around with the colors and positions of the vertices to see what happens! You can also try using different draw modes and vertex formats.
The PoseStack
WARNING
This section's code and the text are discussing different things!
The code showcases Matrix3x2fStack, which is used for HUD rendering since 1.21.8, while the text describes PoseStack, which has slightly different methods.
Read the important update above for more information.
After learning how to write to the BufferBuilder, you might be wondering how to transform your model - or even animate it. This is where the PoseStack class comes in.
The PoseStack class has the following methods:
pushPose()- Pushes a new matrix onto the stack.popPose()- Pops the top matrix off the stack.last()- Returns the top matrix on the stack.translate(x, y, z)- Translates the top matrix on the stack.translate(vec3)scale(x, y, z)- Scales the top matrix on the stack.
You can also multiply the top matrix on the stack using quaternions, which we will cover in the next section.
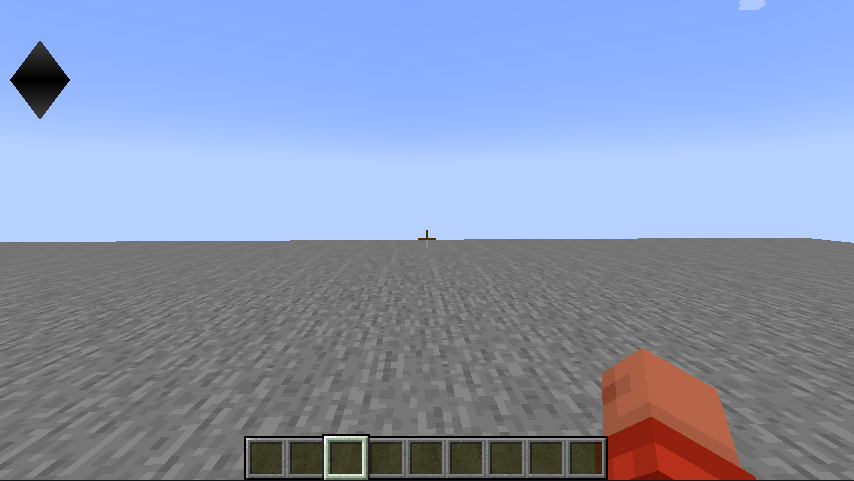
Taking from our example above, we can make our diamond scale up and down by using the PoseStack and the tickDelta - which is the "progress" between the last game tick and the next game tick. We'll clarify this later in the Rendering in the HUD page.
WARNING
You must first push the matrix stack and then pop it after you're done with it. If you don't, you'll end up with a broken matrix stack, which will cause rendering issues.
Make sure to push the matrix stack before you get a transformation matrix!
java
Matrix3x2fStack matrices = graphics.pose();

// Store the total tick delta in a field, so we can use it later.
this.totalTickProgress += deltaTracker.getGameTimeDeltaPartialTick(true);

// Push a new matrix onto the stack.
matrices.pushMatrix();
// Scale the matrix by 0.5 to make the triangle smaller and larger over time.
float scaleAmount = Mth.sin(this.totalTickProgress / 10F) / 2F + 1.5F;

// Apply the scaling amount to the matrix.
// We don't need to scale the Z axis since it's on the HUD and 2D.
matrices.scale(scaleAmount, scaleAmount);
// We do not need to manually write to the buffer. GuiGraphics methods write to GUI buffer in `GuiRenderer` at the end of preparation.

// Pop our matrix from the stack.
matrices.popMatrix();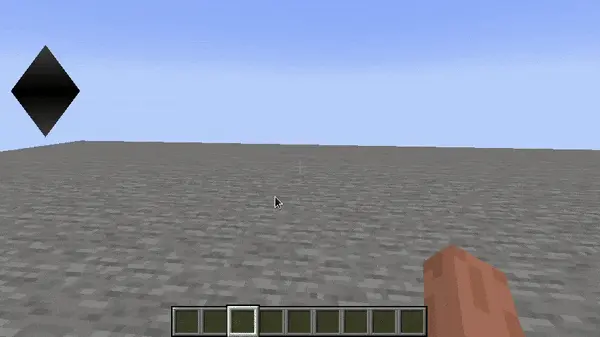
Quaternions (Rotating Things)
WARNING
This section's code and the text are discussing different things!
The code showcases rendering on the HUD, while the text describes rendering the 3D world space.
Read the important update above for more information.
Quaternions are a way of representing rotations in 3D space. They are used to rotate the top matrix on the PoseStack via the rotateAround(quaternionfc, x, y, z) method.
It's highly unlikely you'll need to ever use a Quaternion class directly, since Minecraft provides various pre-built Quaternion instances in its Axis utility class.
Let's say we want to rotate our square around the z-axis. We can do this by using the PoseStack and the rotateAround(quaternionfc, x, y, z) method.
java
// Lerp between 0 and 360 degrees over time.
float rotationAmount = this.totalTickProgress / 50F % 360;
matrices.rotate(rotationAmount);
// Shift entire square so that it rotates in its center.
matrices.translate(-20f, -40f);The result of this is the following: