


Creating Your First Entity 26.1.2
Learn how to register a simple entity and how to give it goals, render, model, and animate it.
Entities are dynamic, interactive objects in the game that are not part of the terrain (like blocks). Entities can move around and interact with the world in various ways. A few examples include:
Villager,Pig, andGoatare all examples of aMob, the most common type of entity - something alive.ZombieandSkeletonare examples of aMonster, a variant of anEntitythat is hostile to thePlayer.MinecartandBoatare examples of aVehicleEntity, which has special logic for accepting player input.
This tutorial will walk you through the process of creating a custom Mini Golem. This entity will have fun animations. It will be a PathfinderMob, which is the class used by most mobs with pathfinding, such as Zombie and Villager.
Preparing Your First Entity
The first step in creating a custom entity is defining its class and registering it with the game.
We'll create the class MiniGolemEntity for our entity, and start by giving it attributes. Attributes decide various things including the maximum health, movement speed, and tempt range of the entity.
java
public class MiniGolemEntity extends PathfinderMob {
	public MiniGolemEntity(Level world) {
		this(ModEntityTypes.MINI_GOLEM, world);
	}

	public MiniGolemEntity(EntityType<? extends MiniGolemEntity> entityType, Level world) {
		super(entityType, world);
	}

	public static AttributeSupplier.Builder createCubeAttributes() {
		return PathfinderMob.createMobAttributes()
				.add(Attributes.MAX_HEALTH, 5)
				.add(Attributes.TEMPT_RANGE, 10)
				.add(Attributes.MOVEMENT_SPEED, 0.3);
}To register your entity, it's recommended to create a separate class, ModEntityTypes, where you register any and all entity types, set their sizes, and register their attributes.
java
public class ModEntityTypes {
	public static final EntityType<MiniGolemEntity> MINI_GOLEM = register(
			"mini_golem",
			EntityType.Builder.<MiniGolemEntity>of(MiniGolemEntity::new, MobCategory.MISC)
					.sized(0.75f, 1.75f)
	);

	private static <T extends Entity> EntityType<T> register(String name, EntityType.Builder<T> builder) {
		ResourceKey<EntityType<?>> key = ResourceKey.create(Registries.ENTITY_TYPE, Identifier.fromNamespaceAndPath(ExampleMod.MOD_ID, name));
		return Registry.register(BuiltInRegistries.ENTITY_TYPE, key, builder.build(key));
	}

	public static void registerModEntityTypes() {
		ExampleMod.LOGGER.info("Registering EntityTypes for " + ExampleMod.MOD_ID);
	}

	public static void registerAttributes() {
		FabricDefaultAttributeRegistry.register(MINI_GOLEM, MiniGolemEntity.createCubeAttributes());
	}
}Adding Goals
Goals are the system that handle an entity's objective/aim, providing them with a defined set of behavior. Goals have a certain priority: goals with a lower value for the priority are prioritized over goals with a higher value for the priority.
To add goals to the entity, you need to create a registerGoals method in your entity's class that defines the goals for the entity.
java
@Override
protected void registerGoals() {
	this.goalSelector.addGoal(0, new TemptGoal(this, 1, Ingredient.of(Items.WHEAT), false));
	this.goalSelector.addGoal(1, new RandomStrollGoal(this, 1));
	this.goalSelector.addGoal(2, new LookAtPlayerGoal(this, Cow.class, 4));
	this.goalSelector.addGoal(3, new RandomLookAroundGoal(this));
}INFO
TemptGoal- The entity is attracted towards a player holding an item.RandomStrollGoal- Walks/wanders around the world.LookAtPlayerGoal- Despite the name, this accepts any entity. Used here to look at theCowentity.RandomLookAroundGoal- To look in random directions.
Creating Rendering
Rendering refers to the process of converting game data such as blocks, entities, and environments into visual representations displayed on the player's screen. This involves determining how objects are illuminated, shaded, and textured.
INFO
Entity rendering is always handled on the client side. The server manages the entity's logic and behavior, while the client is responsible for displaying the entity's model, texture, and animations.
Rendering has multiple steps involving their own classes, but we'll start with the EntityRenderState class.
java
public class MiniGolemEntityRenderState extends LivingEntityRenderState {
}Data stored on the render state is used to determine how the entity is visually represented, including animation states such as movement and idle behaviors.
Setting up the Model
The MiniGolemEntityModel class defines how your entity looks by describing its shape and parts. Models are generally created in third-party tools like Blockbench, rather than being written by hand. Nonetheless, this tutorial will go through a manual example to show you how it works.
WARNING
Blockbench supports multiple mappings (such as Mojang Mappings, Yarn, and others). Ensure you select the correct mapping that matches your development environment - this tutorial uses Mojang Mappings.
Mismatched mappings can cause errors when integrating Blockbench generated code.
java
public class MiniGolemEntityModel extends EntityModel<MiniGolemEntityRenderState> {
	private final ModelPart head;
	private final ModelPart leftLeg;
	private final ModelPart rightLeg;

	public MiniGolemEntityModel(ModelPart root) {
		super(root);
		this.head = root.getChild(PartNames.HEAD);
		this.leftLeg = root.getChild(PartNames.LEFT_LEG);
		this.rightLeg = root.getChild(PartNames.RIGHT_LEG);
}The MiniGolemEntityModel class defines the visual model for a Mini Golem entity. It extends EntityModel, specifying how the entity's body parts (body, head, left leg, and right leg) are named.
java
public static LayerDefinition getTexturedModelData() {
	MeshDefinition modelData = new MeshDefinition();
	PartDefinition root = modelData.getRoot();
	root.addOrReplaceChild(
			PartNames.BODY,
			CubeListBuilder.create().addBox(
					/* x: */ -6,
					/* y: */ -6,
					/* z: */ -6,
					/* width: */ 12,
					/* height: */ 12,
					/* depth: */ 12
			),
			PartPose.offset(0, 8, 0)
	);
	root.addOrReplaceChild(
			PartNames.HEAD,
			CubeListBuilder.create().texOffs(36, 0).addBox(-3, -6, -3, 6, 6, 6),
			PartPose.offset(0, 2, 0)
	);
	root.addOrReplaceChild(
			PartNames.LEFT_LEG,
			CubeListBuilder.create().texOffs(48, 12).addBox(-2, 0, -2, 4, 10, 4),
			PartPose.offset(-2.5f, 14, 0)
	);
	root.addOrReplaceChild(
			PartNames.RIGHT_LEG,
			CubeListBuilder.create().texOffs(48, 12).addBox(-2, 0, -2, 4, 10, 4),
			PartPose.offset(2.5f, 14, 0)
	);
	return LayerDefinition.create(modelData, 64, 32);
}This method defines the Mini Golem's 3D model by creating its body, head, and legs as cuboids, setting their positions and texture mappings, and returning a LayerDefinition for rendering.
Each part is added with an offset point which is the origin for all of the transformations applied to that part. All other coordinates in the model part are measured relative to this offset point.
WARNING
Higher Y values in the model correspond to the bottom of the entity. This is the reverse compared to in-game coordinates.
We'll now need to create a ModEntityModelLayers class in the client package. This entity only has a single texture layer, but other entities may use multiple - think of the secondary skin layer on entities like the Player or a Spider's eyes.
java
public class ModEntityModelLayers {
	public static final ModelLayerLocation MINI_GOLEM = createMain("mini_golem");

	private static ModelLayerLocation createMain(String name) {
		return new ModelLayerLocation(Identifier.fromNamespaceAndPath(ExampleMod.MOD_ID, name), "main");
	}

	public static void registerModelLayers() {
		ModelLayerRegistry.registerModelLayer(ModEntityModelLayers.MINI_GOLEM, MiniGolemEntityModel::getTexturedModelData);
	}
}This class must then be initialized in the mod's client initializer.
java
public class ExampleModCustomEntityClient implements ClientModInitializer {
	@Override
	public void onInitializeClient() {
		ModEntityModelLayers.registerModelLayers();
	}
}Setting up the Texture
TIP
The size of the texture should match the values in the LayerDefinition.create(modelData, 64, 32): 64 pixels wide and 32 pixels tall. If you need a differently-sized texture, then don't forget to change the size in LayerDefinition.create to match.
Each model part / box is expecting a net on the texture in a particular location. By default, it's expecting it at 0, 0 (the top left), but this can be changed by calling the texOffs function in CubeListBuilder.
For example purposes, you can use this texture for assets/example-mod/textures/entity/mini_golem.png
Creating the Renderer
A entity's renderer enables you to view your entity in-game. We'll create a new class, MiniGolemEntityRenderer, which will tell Minecraft what texture, model, and entity render state to use for this entity.
java
public class MiniGolemEntityRenderer extends MobRenderer<MiniGolemEntity, MiniGolemEntityRenderState, MiniGolemEntityModel> {
	private static final Identifier TEXTURE = Identifier.fromNamespaceAndPath(ExampleMod.MOD_ID, "textures/entity/mini_golem.png");

	public MiniGolemEntityRenderer(EntityRendererProvider.Context context) {
		super(context, new MiniGolemEntityModel(context.bakeLayer(ModEntityModelLayers.MINI_GOLEM)), 0.375f); // 0.375 shadow radius
	}

	@Override
	public MiniGolemEntityRenderState createRenderState() {
		return new MiniGolemEntityRenderState();
	}

	@Override
	public Identifier getTextureLocation(MiniGolemEntityRenderState state) {
		return TEXTURE;
	}
}This is also where the shadow radius is set, for this entity that will be 0.375f.
This renderer must then be registered in the mod's client initializer.
java
EntityRenderers.register(ModEntityTypes.MINI_GOLEM, MiniGolemEntityRenderer::new);Adding Walking Animations
The following code can be added to the MiniGolemEntityModel class to give the entity a walking animation.
java
	@Override
	public void setupAnim(MiniGolemEntityRenderState state) {
		super.setupAnim(state);

			this.head.xRot = state.xRot * Mth.RAD_TO_DEG;
			this.head.yRot = state.yRot * Mth.RAD_TO_DEG;
			float limbSwingAmplitude = state.walkAnimationSpeed;
			float limbSwingAnimationProgress = state.walkAnimationPos;
			this.leftLeg.xRot = Mth.cos(limbSwingAnimationProgress * 0.2f + Mth.PI) * 1.4f * limbSwingAmplitude;
			this.rightLeg.xRot = Mth.cos(limbSwingAnimationProgress * 0.2f) * 1.4f * limbSwingAmplitude;
	}
}To start, apply the yaw and pitch to the head model part.
Then, we apply the walking animation to the leg model parts. We use the cos function to create the general leg swing effect and then transform the cosine wave to get the correct swing speed and amplitude.
- The
0.2constant in the formula controls the frequency of the cosine wave (how fast the legs are swinging). Higher values result in a higher frequency. - The
1.4constant in the formula controls the amplitude of the cosine wave (how far the legs swing). Higher values result in a higher amplitude. - The
limbSwingAmplitudevariable also affects the amplitude in the same way as the1.4constant. This variable changes based on the velocity of the entity, so that the legs swing more when the entity is moving faster and swing less or not at all when the entity is moving slower or not moving. - The
Mth.PIconstant for the left leg translates the cosine wave a half phase so that the left leg is swinging the opposite direction to the right leg.
You can plot those on a graph to see what they look like:
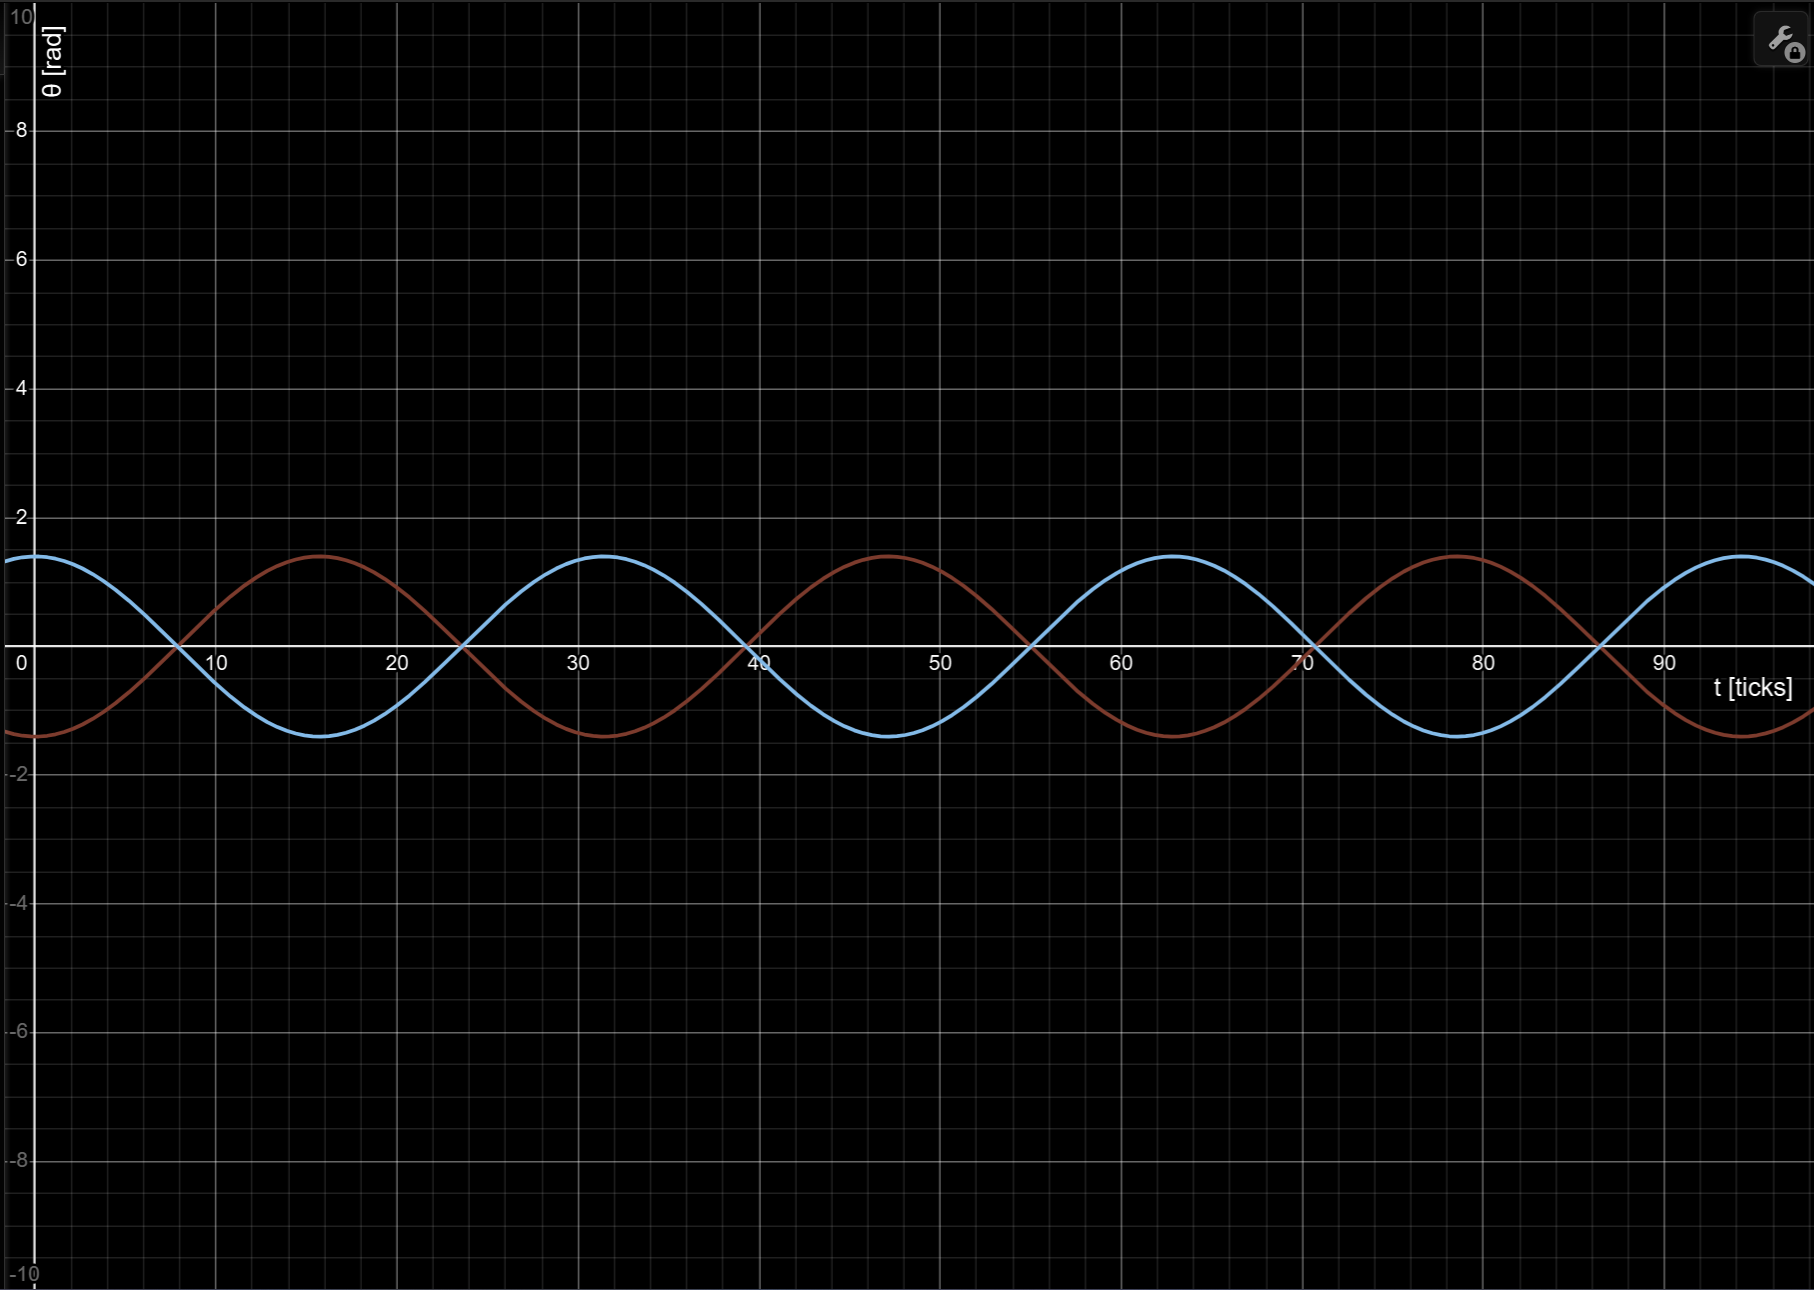
The blue curve is for the left leg, and the brown one is for the right. The horizontal x-axis represents time, and the y-axis indicates the angle of the leg limbs.
Feel free to play around with the constants on Desmos to see how they affect the curve.
Looking into the game, you now have all you need to spawn the entity with /summon example-mod:mini_golem!

Adding Data To An Entity
To store data on an entity, the normal way is to simply add a field in entity class.
Sometimes you need data from the server-side entity to be synced with the client-side entity. See the Networking Page for more info on the client-server architecture. To do this we can use synched data [sic] by defining an EntityDataAccessor for it.
In our case we want our entity to dance every so often, so we need to create a dancing state that is synchronized between the clients so that it can be animated later. However, the dancing cooldown need not be synced with the client because the animation is triggered by the server.
java
private static final EntityDataAccessor<Boolean> DANCING = SynchedEntityData.defineId(MiniGolemEntity.class, EntityDataSerializers.BOOLEAN);
private int dancingTimeLeft;

@Override
protected void defineSynchedData(SynchedEntityData.Builder builder) {
	super.defineSynchedData(builder);
	builder.define(DANCING, false);
}

public boolean isDancing() {
	return entityData.get(DANCING);
}

private void setDancing(boolean dancing) {
	entityData.set(DANCING, dancing);
}

@Override
public void tick() {
	super.tick();

	if (!level().isClientSide()) {
		if (this.isDancing()) {
			if (this.dancingTimeLeft-- <= 0) {
				this.setDancing(false);
			}
		} else {
			if (this.random.nextInt(1000) == 0) {
				this.setDancing(true);
				this.dancingTimeLeft = 100 + this.random.nextInt(100);
			}
		}
	}
}As you can see we added a tick method to control the dancing state.
Storing Data to NBT
For persistent data that can be saved after the game is closed, we will override the addAdditionalSaveData and readAdditionalSaveData methods in MiniGolemEntity. We can use this to store the amount of time remaining in the dancing animation.
java
@Override
protected void addAdditionalSaveData(ValueOutput valueOutput) {
	super.addAdditionalSaveData(valueOutput);
	valueOutput.putInt("dancing_time_left", this.dancingTimeLeft);
}

@Override
protected void readAdditionalSaveData(ValueInput valueInput) {
	super.readAdditionalSaveData(valueInput);
	this.dancingTimeLeft = valueInput.getInt("dancing_time_left").orElse(0);
	this.setDancing(this.dancingTimeLeft > 0);
}Now, whenever the entity is loaded, it will restore the state that it was left in.
Adding an Animation
The first step to adding an animation to the entity is adding the animation state in the entity class. We'll create an animation state that will be used to make the entity dance.
java
public final AnimationState dancingAnimationState = new AnimationState();

@Override
public void onSyncedDataUpdated(EntityDataAccessor<?> data) {
	super.onSyncedDataUpdated(data);

	if (data == DANCING) {
		this.dancingAnimationState.animateWhen(this.isDancing(), this.tickCount);
	}
}We have overridden the onSyncedDataUpdated method. This gets called whenever synched data is updated both the server and the client. The if-statement checks whether the synched data that was updated is the dancing synched data.
Now, we'll move on to animation itself. We will create the MiniGolemAnimations class, and add an AnimationDefinition to define how the animation will be applied to the entity.
java
public class MiniGolemAnimations {
	public static final AnimationDefinition DANCING = AnimationDefinition.Builder.withLength(1)
			.looping()
			.addAnimation(PartNames.HEAD, new AnimationChannel(
					AnimationChannel.Targets.ROTATION,
					new Keyframe(0, KeyframeAnimations.degreeVec(0, 0, 0), AnimationChannel.Interpolations.LINEAR),
					new Keyframe(0.2f, KeyframeAnimations.degreeVec(0, 0, 45), AnimationChannel.Interpolations.LINEAR),
					new Keyframe(0.4f, KeyframeAnimations.degreeVec(0, 0, 0), AnimationChannel.Interpolations.LINEAR),
					new Keyframe(0.6f, KeyframeAnimations.degreeVec(0, 0, 0), AnimationChannel.Interpolations.LINEAR),
					new Keyframe(0.8f, KeyframeAnimations.degreeVec(0, 0, -45), AnimationChannel.Interpolations.LINEAR),
					new Keyframe(1, KeyframeAnimations.degreeVec(0, 0, 0), AnimationChannel.Interpolations.LINEAR)
			))
			.addAnimation(PartNames.LEFT_LEG, new AnimationChannel(
					AnimationChannel.Targets.ROTATION,
					new Keyframe(0, KeyframeAnimations.degreeVec(0, 0, 0), AnimationChannel.Interpolations.LINEAR),
					new Keyframe(0.2f, KeyframeAnimations.degreeVec(0, 0, 45), AnimationChannel.Interpolations.LINEAR),
					new Keyframe(0.4f, KeyframeAnimations.degreeVec(0, 0, 0), AnimationChannel.Interpolations.LINEAR)
			))
			.addAnimation(PartNames.RIGHT_LEG, new AnimationChannel(
					AnimationChannel.Targets.ROTATION,
					new Keyframe(0.5f, KeyframeAnimations.degreeVec(0, 0, 0), AnimationChannel.Interpolations.LINEAR),
					new Keyframe(0.7f, KeyframeAnimations.degreeVec(0, 0, -45), AnimationChannel.Interpolations.LINEAR),
					new Keyframe(0.9f, KeyframeAnimations.degreeVec(0, 0, 0), AnimationChannel.Interpolations.LINEAR)
			))
			.build();
}There's a lot going on here, notice the following key points:
withLength(1)makes the animation last 1 second.looping()makes the animation loop repeatedly.- Then follows a series of
addAnimationcalls which adds individual animations targeting individual model parts. Here, we have different animations targeting the head, left leg, and right leg.- Each animation targets a specific property of that model part, in our case we are changing the rotation of the model part in each case.
- An animation is made up of a list of keyframes. When the time (number of seconds elapsed) of the animation is equal to one of these keyframes, then the value of the property we targeted will be equal to the value we specified for that keyframe (in our case the rotation).
- When the time is between our keyframes, then the value will be interpolated (blended) between the two neighboring keyframes.
- We have used linear interpolation, which is the simplest and changes the value (in our case rotation of the model part) at a constant rate from one keyframe to the next. Vanilla also provides Catmull-Rom spline interpolation, which produces a smoother transition between keyframes.
- Modders can also create custom interpolation types.
To make our animation state available to the renderer, we will store a copy of it in our MiniGolemEntityRenderState.
java
public final AnimationState dancingAnimationState = new AnimationState();To perform the copy, we override extractRenderState in the entity renderer.
java
@Override
public void extractRenderState(MiniGolemEntity entity, MiniGolemEntityRenderState state, float tickProgress) {
	super.extractRenderState(entity, state, tickProgress);
	state.dancingAnimationState.copyFrom(entity.dancingAnimationState);
}Finally, let's hook up the animation to the model:
java
private final KeyframeAnimation dancing;

public MiniGolemEntityModel(ModelPart root) {
	// ...
	this.dancing = MiniGolemAnimations.DANCING.bake(root);
}
@Override
public void setupAnim(MiniGolemEntityRenderState state) {
	super.setupAnim(state);

	if (state.dancingAnimationState.isStarted()) {
		this.dancing.apply(state.dancingAnimationState, state.ageInTicks);
	} else {
		// ... the leg swing animation code from before
		this.head.xRot = state.xRot * Mth.RAD_TO_DEG;
		this.head.yRot = state.yRot * Mth.RAD_TO_DEG;
		float limbSwingAmplitude = state.walkAnimationSpeed;
		float limbSwingAnimationProgress = state.walkAnimationPos;
		this.leftLeg.xRot = Mth.cos(limbSwingAnimationProgress * 0.2f + Mth.PI) * 1.4f * limbSwingAmplitude;
		this.rightLeg.xRot = Mth.cos(limbSwingAnimationProgress * 0.2f) * 1.4f * limbSwingAmplitude;
	}
}When the animation is playing we apply the animation, otherwise we use the old leg animation code.
Adding the Spawn Egg
To add a spawn egg for the Mini Golem entity, refer to the full article on Creating a Spawn Egg.